> ## Documentation Index
> Fetch the complete documentation index at: https://devzone.nayax.com/llms.txt
> Use this file to discover all available pages before exploring further.
# StaticQR
Find quick answers and step-by-step guides for the most common questions about Nayax API integration, device configuration, transaction tracking, and deployment processes. Navigate the categories below to find solutions and best practices.
### How do I whitelist Nayax's IPs?
To ensure that your system reliably receives communication from Nayax (such as `StartSession` and `SaleEndNotification` requests), you must configure your network firewall to **whitelist Nayax's server IP ranges**.
You have two options for configuring these rules, both of which cover the same necessary range of addresses.
### Option 1: Full Range Whitelist (Recommended)
This is the simplest method, using a single CIDR block that covers all current Nayax server IPs. This is the **recommended approach** for ease of maintenance.
* **Single CIDR Block:** **`185.159.232.0/22`**
### Option 2: Server-Specific Whitelist
Use this option if your firewall configuration requires more granular rules or if you need to segregate rules by geographic location.
| Server Location | CIDR Block |
| :--------------------- | :----------------- |
| **Israel (IL)** | `185.159.232.0/24` |
| **Germany (DE)** | `185.159.234.0/24` |
| **United States (US)** | `185.159.233.0/24` |
### What are the endpoints for each of the commands?
Each command uses a specific endpoint, depending on whether the call is **customer-initiated** (sent **TO** Nayax) or **Nayax-initiated** (sent **TO** the customer's URL).
### 1. Customer-Initiated Command (Sent TO Nayax)
This command is initiated from the customer's system and is directed to Nayax's payment API.
| Command | Endpoint Format |
| :-------- | :------------------------------------------------------------------------------------- |
| **Start** | `https://lynx.nayax.com/payment/v2/transactions/cortina/(payment method's name)/start` |
### 2. Nayax-Initiated Commands (Sent TO Customer's URL)
These commands are initiated by Nayax and directed to the customer's configured base URL.
#### Simple Commands (Session & Notification)
These use the customer's base URL followed by the command name:
| Command | Endpoint Format |
| :---------------------- | :--------------------------------------------- |
| **StartSession** | `(customer's URL)/Cortina/StartSession` |
| **SaleEndNotification** | `(customer's URL)/Cortina/SaleEndNotification` |
#### StaticQR Integration Commands
These include the integration type (`StaticQR`) in the path:
| Command | Endpoint Format |
| :---------------- | :------------------------------------------------ |
| **Authorization** | `(customer's URL)/Cortina/StaticQR/Authorization` |
| **Settlement** | `(customer's URL)/Cortina/StaticQR/Settlement` |
| **Cancel** | `(customer's URL)/Cortina/StaticQR/Cancel` |
| **Sale** | `(customer's URL)/Cortina/StaticQR/Sale` |
| **Void** | `(customer's URL)/Cortina/StaticQR/Void` |
### \[UniQR] How do I use the QR sticker that comes with the device to wake up the machine (instead of the device's SN)?
First, connect the sticker to your device via the MOMA app. See [How to Connect Your Unattended Machine via the MoMa 2.0 App and Your QR Code Sticker](https://www.youtube.com/watch?v=DLaMQ-x-ra8) to learn more.
Once connected, Nayax's servers establish a link between the scanned URL and the device:
The Smart Sticker ID is matched to the device's virtual machine ID.
When scanned, the QR code generates a long URL that contains the specific identifier required for the transaction.
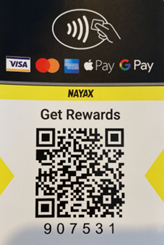
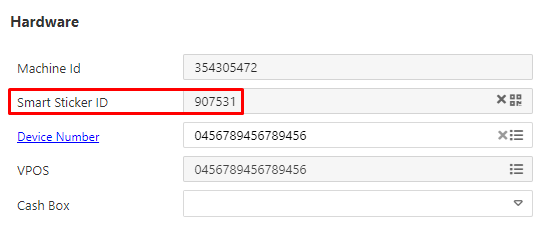 In the example above, the smart sticker ID is 907531, and when I hover my phone over the QR, I get the following URL:
[https://preview.page.link/m.monyx.com/?link=https://m.monyx.com/?data%3D1;https://qr.nayax.com/v1/rWg\_p6pZh1pwjvbkGrmBLy3KgwSz3dq-y63r5FPxk2NOWw2\&apn=com.monyx.wallet\&isi=1455956409\&ibi=com.monyx.wallet](https://preview.page.link/m.monyx.com/?link=https://m.monyx.com/?data%3D1;https://qr.nayax.com/v1/rWg_p6pZh1pwjvbkGrmBLy3KgwSz3dq-y63r5FPxk2NOWw2\&apn=com.monyx.wallet\&isi=1455956409\&ibi=com.monyx.wallet)
**Note:** You need to use only the part which starts with [http://qr.nayax.com/v1/x](http://qr.nayax.com/v1/x) (until the "&"), meaning in my case I'd use
[https://qr.nayax.com/v1/rWg\_p6pZh1pwjvbkGrmBLy3KgwSz3dq-y63r5FPxk2NOWw2](https://qr.nayax.com/v1/rWg_p6pZh1pwjvbkGrmBLy3KgwSz3dq-y63r5FPxk2NOWw2).
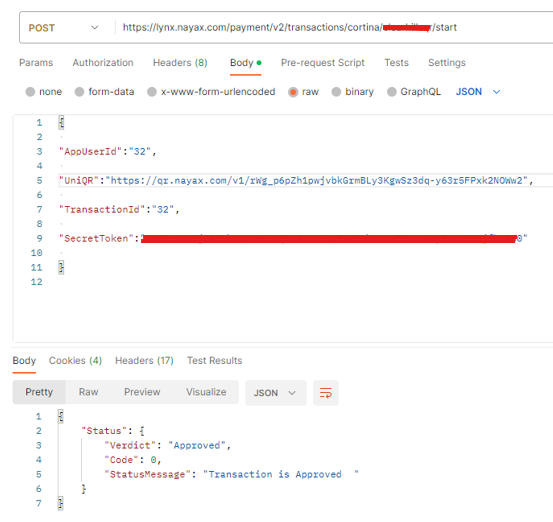
You would use "UniQR" field instead of "TerminalID", and insert the value of the QR code (Not the number written on it) as the value of it:
In the example above, the smart sticker ID is 907531, and when I hover my phone over the QR, I get the following URL:
[https://preview.page.link/m.monyx.com/?link=https://m.monyx.com/?data%3D1;https://qr.nayax.com/v1/rWg\_p6pZh1pwjvbkGrmBLy3KgwSz3dq-y63r5FPxk2NOWw2\&apn=com.monyx.wallet\&isi=1455956409\&ibi=com.monyx.wallet](https://preview.page.link/m.monyx.com/?link=https://m.monyx.com/?data%3D1;https://qr.nayax.com/v1/rWg_p6pZh1pwjvbkGrmBLy3KgwSz3dq-y63r5FPxk2NOWw2\&apn=com.monyx.wallet\&isi=1455956409\&ibi=com.monyx.wallet)
**Note:** You need to use only the part which starts with [http://qr.nayax.com/v1/x](http://qr.nayax.com/v1/x) (until the "&"), meaning in my case I'd use
[https://qr.nayax.com/v1/rWg\_p6pZh1pwjvbkGrmBLy3KgwSz3dq-y63r5FPxk2NOWw2](https://qr.nayax.com/v1/rWg_p6pZh1pwjvbkGrmBLy3KgwSz3dq-y63r5FPxk2NOWw2).
You would use "UniQR" field instead of "TerminalID", and insert the value of the QR code (Not the number written on it) as the value of it:
 ### Creating QRs of your own
If you want to use a custom QR code that directs users to your own application, you must integrate a Nayax-provided HASH code into your URL.
```
/{hashCode}
```
Nayax will provide a list of HASH details, including a unique UniQRCode (the HASH) for each machine.
### Creating QRs of your own
If you want to use a custom QR code that directs users to your own application, you must integrate a Nayax-provided HASH code into your URL.
```
/{hashCode}
```
Nayax will provide a list of HASH details, including a unique UniQRCode (the HASH) for each machine.
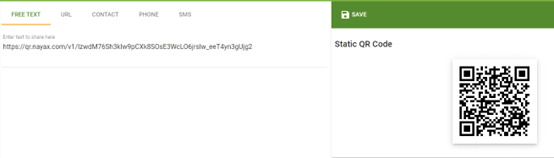
 1. Take your desired link (e.g., [https://YourApp.com](https://YourApp.com)) and append the HASH code to the end:
 2. Use the MOMA app to scan and attach the original Nayax QR sticker to the desired virtual machine: **Actions > Attach a sticker > Scan the original QR**.
 3. Now you can use the:
```
/{hashCode}
```
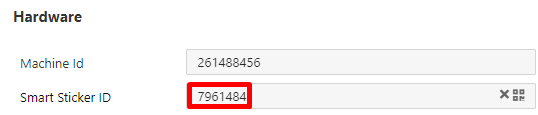
Once linked, the UniQRNumber will appear in your virtual machine's Smart Sticker ID field, confirming the match.
### Example
Let's say that I've got a customer who is named "MagicQR," and they want to generate their own QR code and have it be able to trigger their app, and they've got this UniQRNumber and UniQRCode:
3. Now you can use the:
```
/{hashCode}
```
Once linked, the UniQRNumber will appear in your virtual machine's Smart Sticker ID field, confirming the match.
### Example
Let's say that I've got a customer who is named "MagicQR," and they want to generate their own QR code and have it be able to trigger their app, and they've got this UniQRNumber and UniQRCode:
 They would first need to link the UniQRCode to the MoMa app, as mentioned above (to get the UniQRNumber linked to the desired virtual machine), then link the hash.
After the link was made, they would use the same hash in their own URL:
[https://MagicQR.com/IzwdM76Sh3kIw9pCXk8SOsE3WcLO6jrslw\_eeT4yn3gUjg2](https://MagicQR.com/IzwdM76Sh3kIw9pCXk8SOsE3WcLO6jrslw_eeT4yn3gUjg2)
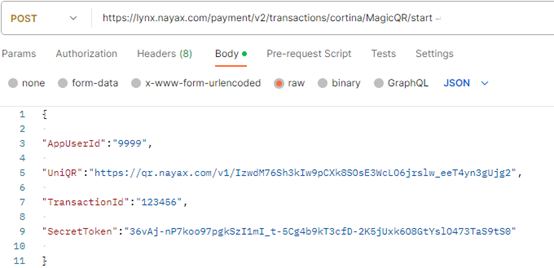
This would mean that once a consumer has scanned this URL and MagicQR is ready to direct them for payment, they would need to take the hash at the end of the URL and revert it to the UniQRCode provided by Nayax, and then have "Start" include the URL in the "UniQR" field:
They would first need to link the UniQRCode to the MoMa app, as mentioned above (to get the UniQRNumber linked to the desired virtual machine), then link the hash.
After the link was made, they would use the same hash in their own URL:
[https://MagicQR.com/IzwdM76Sh3kIw9pCXk8SOsE3WcLO6jrslw\_eeT4yn3gUjg2](https://MagicQR.com/IzwdM76Sh3kIw9pCXk8SOsE3WcLO6jrslw_eeT4yn3gUjg2)
This would mean that once a consumer has scanned this URL and MagicQR is ready to direct them for payment, they would need to take the hash at the end of the URL and revert it to the UniQRCode provided by Nayax, and then have "Start" include the URL in the "UniQR" field:
 ```json theme={null}
{
"AppUserID": "9999",
"UniQR": "https://qr.nayax.com/v1/rWg_p6pZh1pwjvbkGrmBLy3KgwSz3dq-y63r5FPxk2NOWw2",
"TransactionId": "123456",
"SecretToken": "*****"
}
```
```json theme={null}
{
"AppUserID": "9999",
"UniQR": "https://qr.nayax.com/v1/rWg_p6pZh1pwjvbkGrmBLy3KgwSz3dq-y63r5FPxk2NOWw2",
"TransactionId": "123456",
"SecretToken": "*****"
}
```