> ## Documentation Index
> Fetch the complete documentation index at: https://devzone.nayax.com/llms.txt
> Use this file to discover all available pages before exploring further.
# Android App
The SDK provides a demo application with source code that enables you to test the integration from day one. This demo provides a fully functional application that uses the Nayax SDK APIs to communicate with the EMV Core. You can use the source application as a foundation for developing your own system.
Before starting, ensure your Reader is registered with the Nayax Core system. Without registration, payment transactions cannot be completed.
## Installation
The SDK includes the following files:
| File Name | Description |
| ----------------------------------------------------- | ------------------------------------------------------------------------------- |
| `com.nayax.emvCore-release-v.v-bbb.apk` | The EMV Core service package. |
| `com.nayax.emv_core_android_test-release-v.v-bbb.apk` | The SDK sample application. |
| `emv-core-test-v.v-bbb.zip` | Android Studio project with library and sample application source code in Java. |
To install the demo application, follow the steps below:
1. Install the EMV Core Service `com.nayax.emvCore-release-x.x-xxx.apk` on your Android device.
2. Install the Test application `com.nayax.emv_core_android_test-release-x.x.x.apk`.
If you experience communication issues between the EMV Core service and the application or Reader, restart the EMV Core service.
## Using the demo application
To start using the test application, you can follow the steps below:
1. Connect your UNO reader to your Android device. If you get a system message saying, “Allow EmvCore Service to access Saturn 8700,” press **OK**.
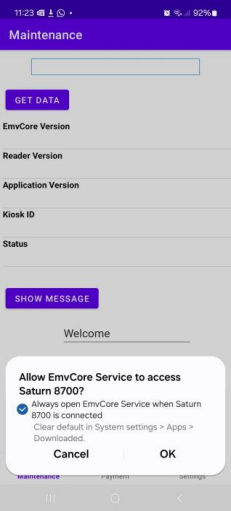 If this message appears frequently, you can configure your device to reduce prompts:
* Whitelist the Nayax Reader in your Android OS settings.
* On your mobile device, check the **Always open EmvCore service when Saturn 8700 is connected** option and press **OK**.
* It’s also recommended to allow the **Stop optimizing battery usage** option when prompted.
2. The application will automatically attempt to connect to the EMV Core service and the UNO Reader. Once the connection is successful, the status line at the top of the screen will display **Ready**.
### Navigating the application
The demo application includes multiple pages for performing specific actions.
### Maintenance page
If this message appears frequently, you can configure your device to reduce prompts:
* Whitelist the Nayax Reader in your Android OS settings.
* On your mobile device, check the **Always open EmvCore service when Saturn 8700 is connected** option and press **OK**.
* It’s also recommended to allow the **Stop optimizing battery usage** option when prompted.
2. The application will automatically attempt to connect to the EMV Core service and the UNO Reader. Once the connection is successful, the status line at the top of the screen will display **Ready**.
### Navigating the application
The demo application includes multiple pages for performing specific actions.
### Maintenance page
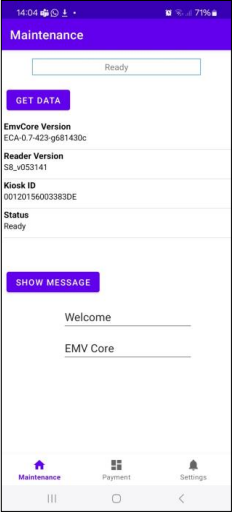 On the **Maintenance** page, you can perform the following actions:
* **Get Data:** Retrieves the version information and status from the EMV Core service and Reader.
* **Show Message (UNO-PLUS readers only):** Allows you to edit and send two lines of text to the Reader's display.
### Settings page
On the **Maintenance** page, you can perform the following actions:
* **Get Data:** Retrieves the version information and status from the EMV Core service and Reader.
* **Show Message (UNO-PLUS readers only):** Allows you to edit and send two lines of text to the Reader's display.
### Settings page
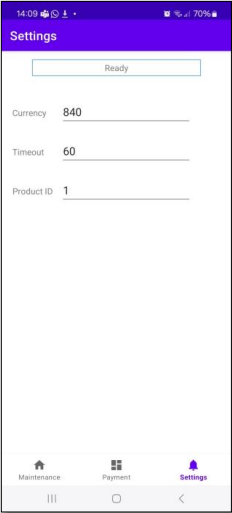 On the **Settings** page, you can configure the following options:
* **Currency Code:** Enter the currency code (e.g., `840` for USD or `978` for Euro).
* **Product ID:** Optionally, assign an identifier for the product to track it in transaction logs and reports.
* **Timeout:** Set a timeout duration (in seconds) for transactions. The maximal time is `60` seconds, for unlimited polling use 'continuous=true'.
* **Continuous:** Automatically renew the transaction polling when a timeout occurs, allowing unlimited polling. It can be stopped with the `CancelTransaction` command.
### Payment page
Run a payment transaction:
1. Select **Authorize** for a two-step transaction or **Pay** for a single-step transaction.
2. Enter the transaction **Amount**.
3. Press **START** to initiate the transaction. The virtual display will show **Present card**, and the status line will display **Payment transaction**.
On the **Settings** page, you can configure the following options:
* **Currency Code:** Enter the currency code (e.g., `840` for USD or `978` for Euro).
* **Product ID:** Optionally, assign an identifier for the product to track it in transaction logs and reports.
* **Timeout:** Set a timeout duration (in seconds) for transactions. The maximal time is `60` seconds, for unlimited polling use 'continuous=true'.
* **Continuous:** Automatically renew the transaction polling when a timeout occurs, allowing unlimited polling. It can be stopped with the `CancelTransaction` command.
### Payment page
Run a payment transaction:
1. Select **Authorize** for a two-step transaction or **Pay** for a single-step transaction.
2. Enter the transaction **Amount**.
3. Press **START** to initiate the transaction. The virtual display will show **Present card**, and the status line will display **Payment transaction**.
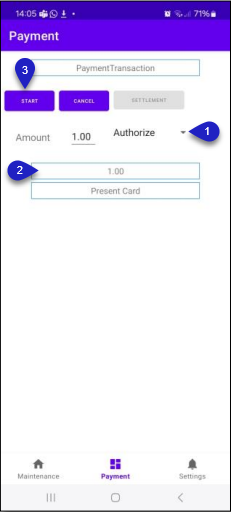 4. Present the EMV card to the Reader.
5. Once the transaction response arrives, it will appear on the screen, allowing you to proceed to the settlement page.
4. Present the EMV card to the Reader.
5. Once the transaction response arrives, it will appear on the screen, allowing you to proceed to the settlement page.
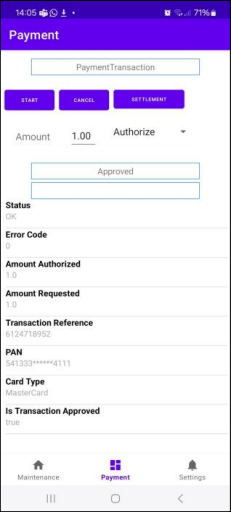 6. You can also continue to run another authorization. The previous transaction may be kept open (Authorized) or automatically confirmed according to the `PMT_KIOSK_AUTOCONFIRM` configuration option.
### Config page
6. You can also continue to run another authorization. The previous transaction may be kept open (Authorized) or automatically confirmed according to the `PMT_KIOSK_AUTOCONFIRM` configuration option.
### Config page
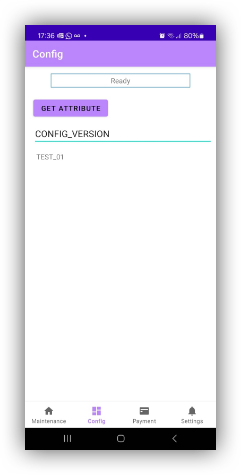 On the Config page, you can test the `GetAttribute` command:
1. Insert the Attribute name, such as `CONFIG_VERSION`.
2. Press `GET ATTRIBUTE` to get the attribute value from the Config file.
On the Config page, you can test the `GetAttribute` command:
1. Insert the Attribute name, such as `CONFIG_VERSION`.
2. Press `GET ATTRIBUTE` to get the attribute value from the Config file.