> ## Documentation Index
> Fetch the complete documentation index at: https://devzone.nayax.com/llms.txt
> Use this file to discover all available pages before exploring further.
# Payment with Pre-Authorization
Nayax recommends the pre-authorization approach. It splits payment into two steps:
1. Pre-authorization
2. Settlement
If you prefer, you can perform the authorization and settlement in just one step. To learn more about this process, visit the [Single Step Payment](/docs/integrate-pos-device/emv-core/payment-flows/single-step-payment) page.
## Pre-Authorization
In the first step, the host machine uses the EMV Core to authorize a specified amount for the payment operation with the buyer's card.
The following diagram shows the transaction flow for a **pre-authorization**:
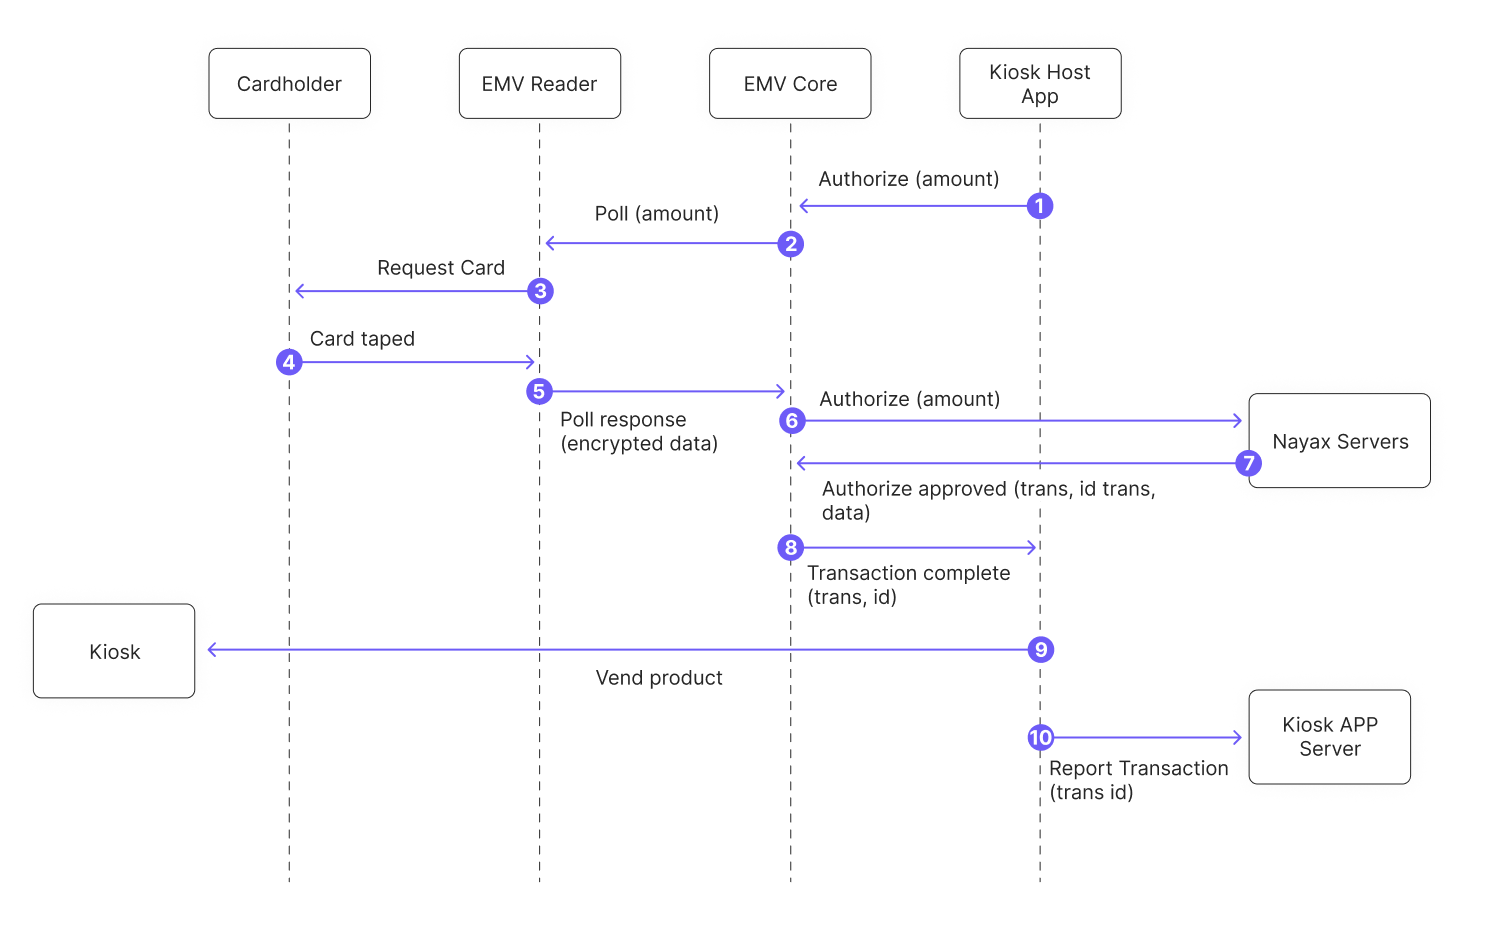 Where:
1. The host machine calls the [`PreAuthorize`](/docs/integrate-pos-device/emv-core/sdk-methods-functions/payment-1#preauthorize) method using the EMV Core API. This is the only action performed by the host machine.
2. EMV Core polls the reader. Your application should prompt the user to tap their card.
3. The reader prompts the user to present their card.
4. The user taps their card.
5. The reader sends the encrypted card data to EMV Core.
6. EMV Core sends the data to the Nayax servers to authorize the amount from step 1.
7. The Nayax servers return the authorization response with the transaction ID and data.
8. EMV Core triggers the `TransactionComplete` event with the transaction ID and result.
The `TransactionComplete` callback fires regardless of the result — approved, declined, or timed out. Check the transaction data to determine the result and decide how to proceed.
After the transaction is approved, proceed with your selling flow: deliver the product, start charging, or perform any other operation. You can also store the transaction ID and data on your server.
## Settlement
Settlement defines the final amount and charges it to the buyer's card. It starts after the product is delivered or the operation (such as EV charging) is complete.
Where:
1. The host machine calls the [`PreAuthorize`](/docs/integrate-pos-device/emv-core/sdk-methods-functions/payment-1#preauthorize) method using the EMV Core API. This is the only action performed by the host machine.
2. EMV Core polls the reader. Your application should prompt the user to tap their card.
3. The reader prompts the user to present their card.
4. The user taps their card.
5. The reader sends the encrypted card data to EMV Core.
6. EMV Core sends the data to the Nayax servers to authorize the amount from step 1.
7. The Nayax servers return the authorization response with the transaction ID and data.
8. EMV Core triggers the `TransactionComplete` event with the transaction ID and result.
The `TransactionComplete` callback fires regardless of the result — approved, declined, or timed out. Check the transaction data to determine the result and decide how to proceed.
After the transaction is approved, proceed with your selling flow: deliver the product, start charging, or perform any other operation. You can also store the transaction ID and data on your server.
## Settlement
Settlement defines the final amount and charges it to the buyer's card. It starts after the product is delivered or the operation (such as EV charging) is complete.
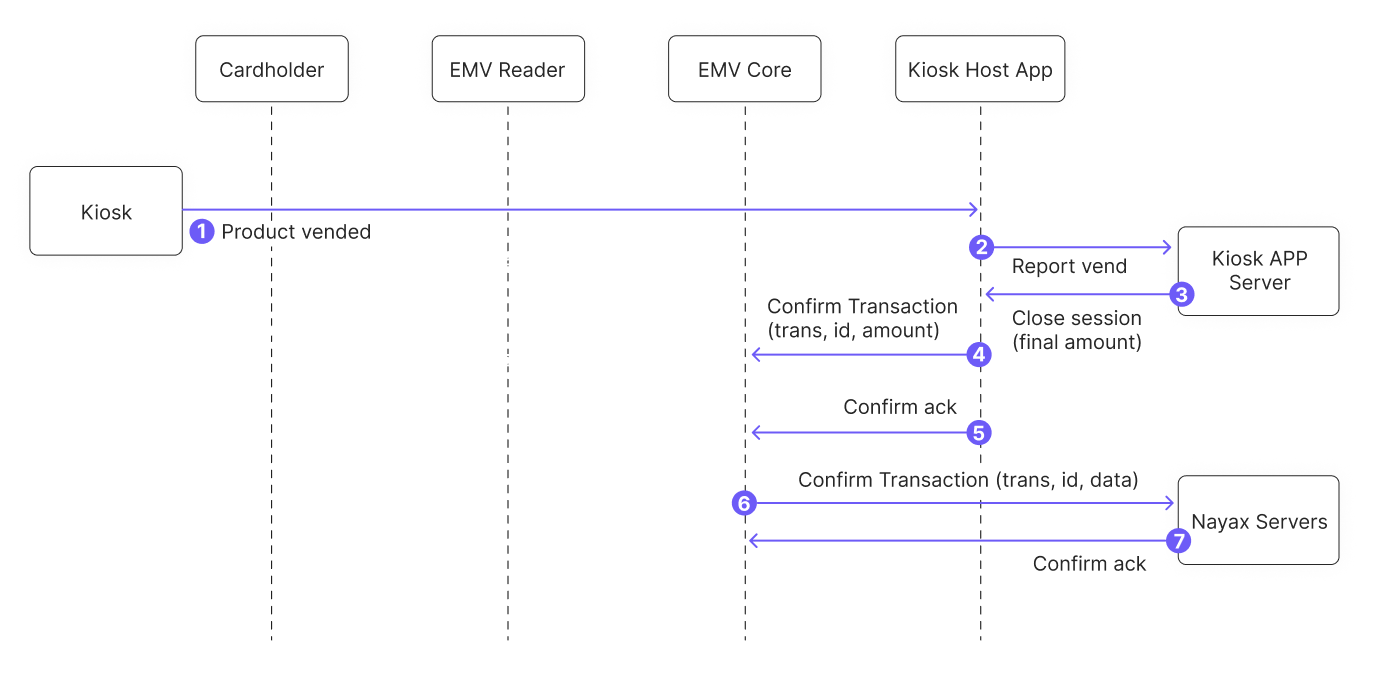 1. The selling operation completes. For example, the product is delivered to the buyer.
2. Your application reports the sale to your application server.
3. The application server closes the session.
4. Your application calls [`ConfirmTransaction`](/docs/integrate-pos-device/emv-core/sdk-methods-functions/payment-1#confirmtransaction) with the transaction ID and the final amount to charge.
The final amount can differ from the pre-authorized amount. To avoid problems, use the maximum expected amount at authorization if the final amount may vary.
5. EMV Core confirms the amount and initiates settlement with the Nayax servers. Settlement is not yet complete at this point.
6. EMV Core sends the transaction ID and amount to the Nayax servers.
7. The Nayax servers return an acknowledgment so EMV Core does not need to resend the confirmation.
Nayax processes the settlement and transfers the funds.
To cancel a pre-authorized transaction, send a void operation instead of a confirm.
1. The selling operation completes. For example, the product is delivered to the buyer.
2. Your application reports the sale to your application server.
3. The application server closes the session.
4. Your application calls [`ConfirmTransaction`](/docs/integrate-pos-device/emv-core/sdk-methods-functions/payment-1#confirmtransaction) with the transaction ID and the final amount to charge.
The final amount can differ from the pre-authorized amount. To avoid problems, use the maximum expected amount at authorization if the final amount may vary.
5. EMV Core confirms the amount and initiates settlement with the Nayax servers. Settlement is not yet complete at this point.
6. EMV Core sends the transaction ID and amount to the Nayax servers.
7. The Nayax servers return an acknowledgment so EMV Core does not need to resend the confirmation.
Nayax processes the settlement and transfers the funds.
To cancel a pre-authorized transaction, send a void operation instead of a confirm.