> ## Documentation Index
> Fetch the complete documentation index at: https://devzone.nayax.com/llms.txt
> Use this file to discover all available pages before exploring further.
# Machine Configuration Overview
> Set up your Operator and machine in Nayax Core before configuring a Spark feature, including device firmware requirements and provider association.
Before a Spark feature works on a terminal, you configure the machine in Nayax Core,
the Nayax back-office system. First, confirm your Operator is linked to your Spark
provider. Then select or create the machine and open the page for the feature you are
integrating.
## Prerequisites
You need the following before you start:
* A VPOS Touch or Onyx terminal that is not connected through a cable.
* An account in Nayax Core with an actor, a machine, and a user role.
* Your Spark provider entity set up in Nayax Core.
You must log in to Nayax Core with your credentials before any action described on
this page.
Certain provider-level configurations are managed internally by Nayax and are not
exposed in the Nayax Core interface. If you need one of these changed, contact your
Nayax Support representative.
## Device Firmware Requirements
To procure a Nayax device, power supply, and cables, contact your Nayax Sales
representative. To support the Spark features you plan to use, the device must run one
of the firmware versions below, or a newer official version:
| Feature | Minimum firmware version |
| :------------------------------ | :----------------------- |
| Remote Start (with Device Stop) | `4.0.24.3-RC06` |
| Device Start (with Device Stop) | `4.0.25.5-RC04` |
## Associate Your Operator with Spark
Confirm that your Operator is associated with your Spark entity in Nayax Core:
Log in to Nayax Core, then click **Administration > Operator**.
Start typing the Operator name in the **Operator** search bar and select it from
the suggestions, then click **Search**. Alternatively, click **Search** and locate
the Operator in the hierarchy.
Select the Operator in the hierarchy, then click the **VAS Provider** tab. Under
the **Spark** section, your Spark integration name appears in the **Provider Name**
field.
If you do not see the **VAS Provider** tab, or the **Provider Name** under the
**Spark** section is not your Spark integration name, contact your Nayax Support
representative.
## Select or Create Your Machine
Open the machine you want to configure for Spark, or create one if none exists:
Log in to Nayax Core, then click **Operations > Machines**.
Start typing your Operator name in the **Operator** search bar and select it from
the suggestions, then click **Search**. Alternatively, click **Search** and locate
the Operator in the hierarchy. A list of machines appears with their actor tree.
Click the machine you want to configure. If no machine is available, you can create
a new machine or duplicate an existing one. For step-by-step guidance, click the
**Need Assistance** button on the right.
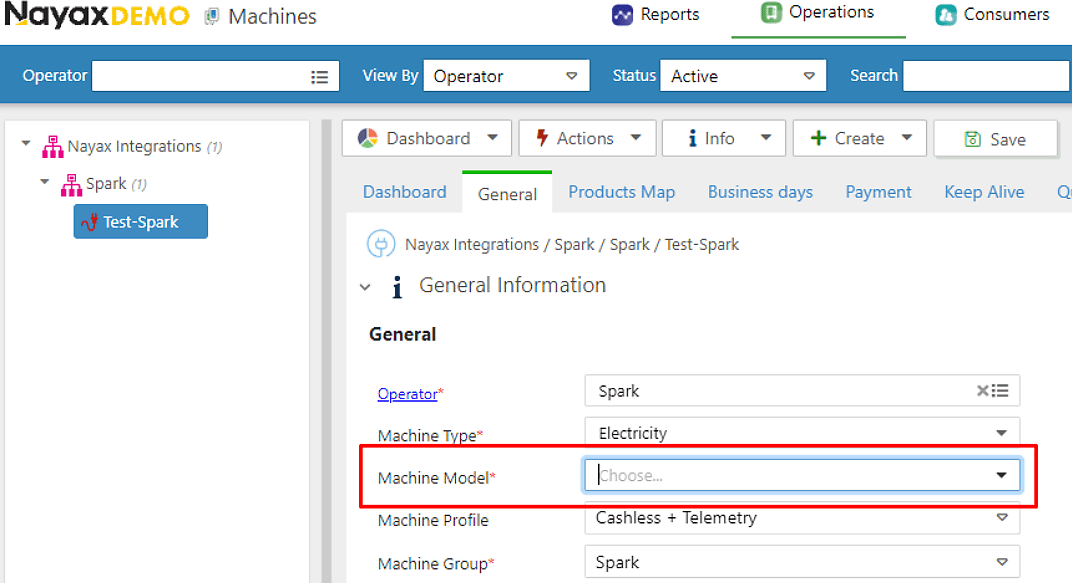
 For a new machine, under **General Information > General > Machine Model**, use the
machine model suggested by Nayax Support. The machine model determines the initial
machine configuration in Nayax Core, which can save you steps later. You can change
or add configurations to the initial setup at any time.
For a new machine, under **General Information > General > Machine Model**, use the
machine model suggested by Nayax Support. The machine model determines the initial
machine configuration in Nayax Core, which can save you steps later. You can change
or add configurations to the initial setup at any time.
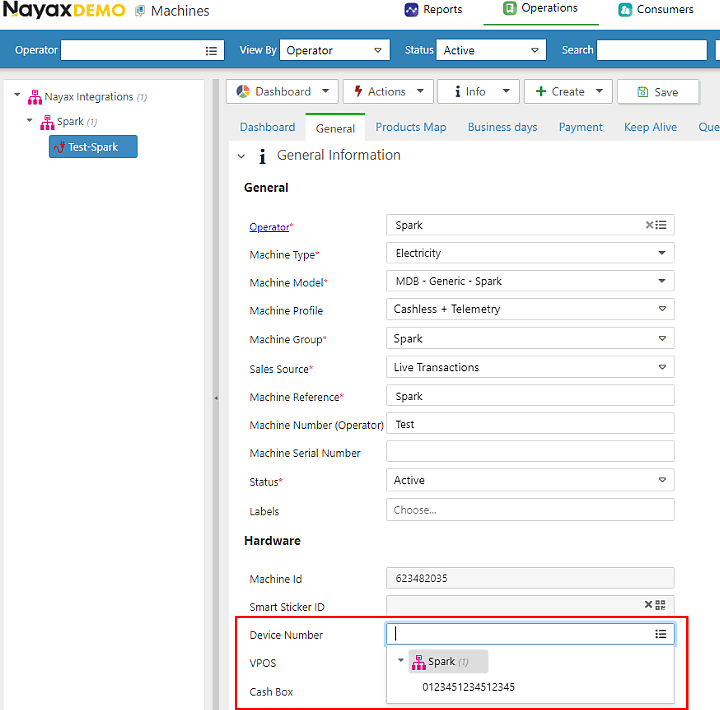
 Under **General Information > Hardware > Device Number**, enter your device number
and click **Save**. If no device is available, contact your Nayax Support
representative.
Under **General Information > Hardware > Device Number**, enter your device number
and click **Save**. If no device is available, contact your Nayax Support
representative.
 For general payment configurations, contact your Nayax Support representative. For the
configurations specific to each Spark feature, see the page for the feature you are
integrating. For optional settings such as POS display timeouts and idle mode images,
see [Additional Features](/docs/integrate-pos-device/spark/machine-configuration/additional-features).
## Next Steps
Configure a machine so your server can start transactions remotely.
Configure a machine so transactions start from the terminal itself.
Configure a machine so a card at the terminal stops an active transaction.
Configure a machine so your server settles or cancels a terminal-authorized transaction.
For general payment configurations, contact your Nayax Support representative. For the
configurations specific to each Spark feature, see the page for the feature you are
integrating. For optional settings such as POS display timeouts and idle mode images,
see [Additional Features](/docs/integrate-pos-device/spark/machine-configuration/additional-features).
## Next Steps
Configure a machine so your server can start transactions remotely.
Configure a machine so transactions start from the terminal itself.
Configure a machine so a card at the terminal stops an active transaction.
Configure a machine so your server settles or cancels a terminal-authorized transaction.