> ## Documentation Index
> Fetch the complete documentation index at: https://devzone.nayax.com/llms.txt
> Use this file to discover all available pages before exploring further.
# Create User for Queue Access
After setting up the queue permissions, AWS requires a user account to interact with the queue programmatically. This user will utilize the previously created policy to secure queue access.
## Types of AWS Users
AWS offers various methods to manage users and provide access to resources, including users created in IAM, federated users, and users managed through IAM Identity Center.
1. **IAM Users (Long-Term Credentials)**
* **Description:** These are users created directly in AWS IAM, with long-term credentials (e.g., Access Keys) to access AWS resources.
* **Primary Use Cases:**
* Applications or services that cannot use IAM roles.
* Third-party clients requiring programmatic access keys.
* Scenarios where the **IAM Identity Center** is unavailable.
* **Considerations:**
* Long-term credentials are not recommended for individuals as they pose greater security risks.
Regularly rotate access keys to minimize potential security threats.
2. **IAM Identity Center Users (Short-Term Credentials)**
* **Description:** Users created in the **IAM Identity Center** (formerly AWS SSO) can obtain temporary credentials to interact with AWS resources.
* **Primary Use Cases:**
* Workforce users (e.g., employees) needing centralized and secure access to multiple AWS accounts or applications.
* Integration with external identity providers like **Okta, Microsoft Entra, or Active Directory** for access management.
* **Advantages:**
* Supports MFA (multi-factor authentication) for enhanced security.
* Simplifies access with single sign-on (SSO) and centralized control.
3. **Federated Users**
* **Description:** Users authenticated through an external identity provider (IdP), such as Login with Amazon, Facebook, Google, or a corporate IdP compatible with **SAML 2.0 or OIDC**.
* **Primary Use Cases:**
* Integrating existing users from a corporate directory or mobile/web app without creating IAM users in AWS.
* **Advantages:**
* Leverages temporary credentials for increased security.
* Enables seamless SSO for a smoother and more secure user experience.
**Key Recommendation**
* For individuals or internal users, it is recommended to use **IAM Identity Center** to manage centralized access and provide temporary credentials.
* For programmatic integrations requiring long-term credentials, use **IAM Users** with strict policies and frequent key rotation.
* Consider **federating users** if your organization already has an identity management system or for cases requiring access from mobile or web applications.
For more information, see [**Support programmatic user access**](https://docs.aws.amazon.com/IAM/latest/UserGuide/introduction_identity-management.html#gs-get-keys).
In this case, you will create a **Programmatic Access user**.
## Add User
To create a user, follow these steps:
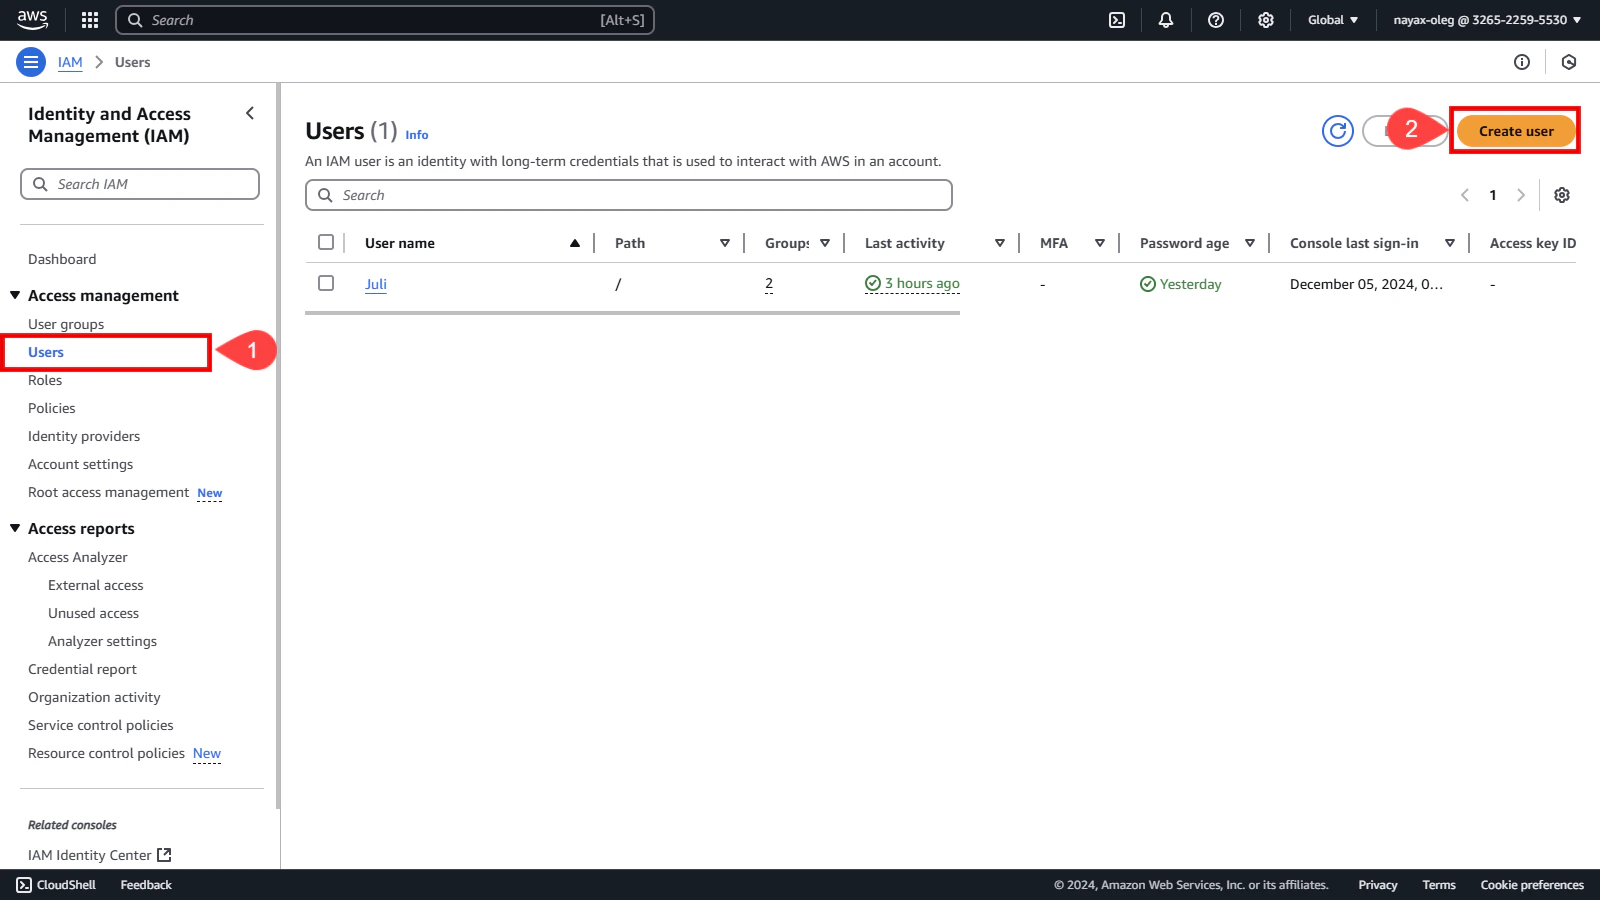
1. Go to **Users** in the left side menu under **Identity and Access Management (IAM)**.
2. Click the **Create User** button.
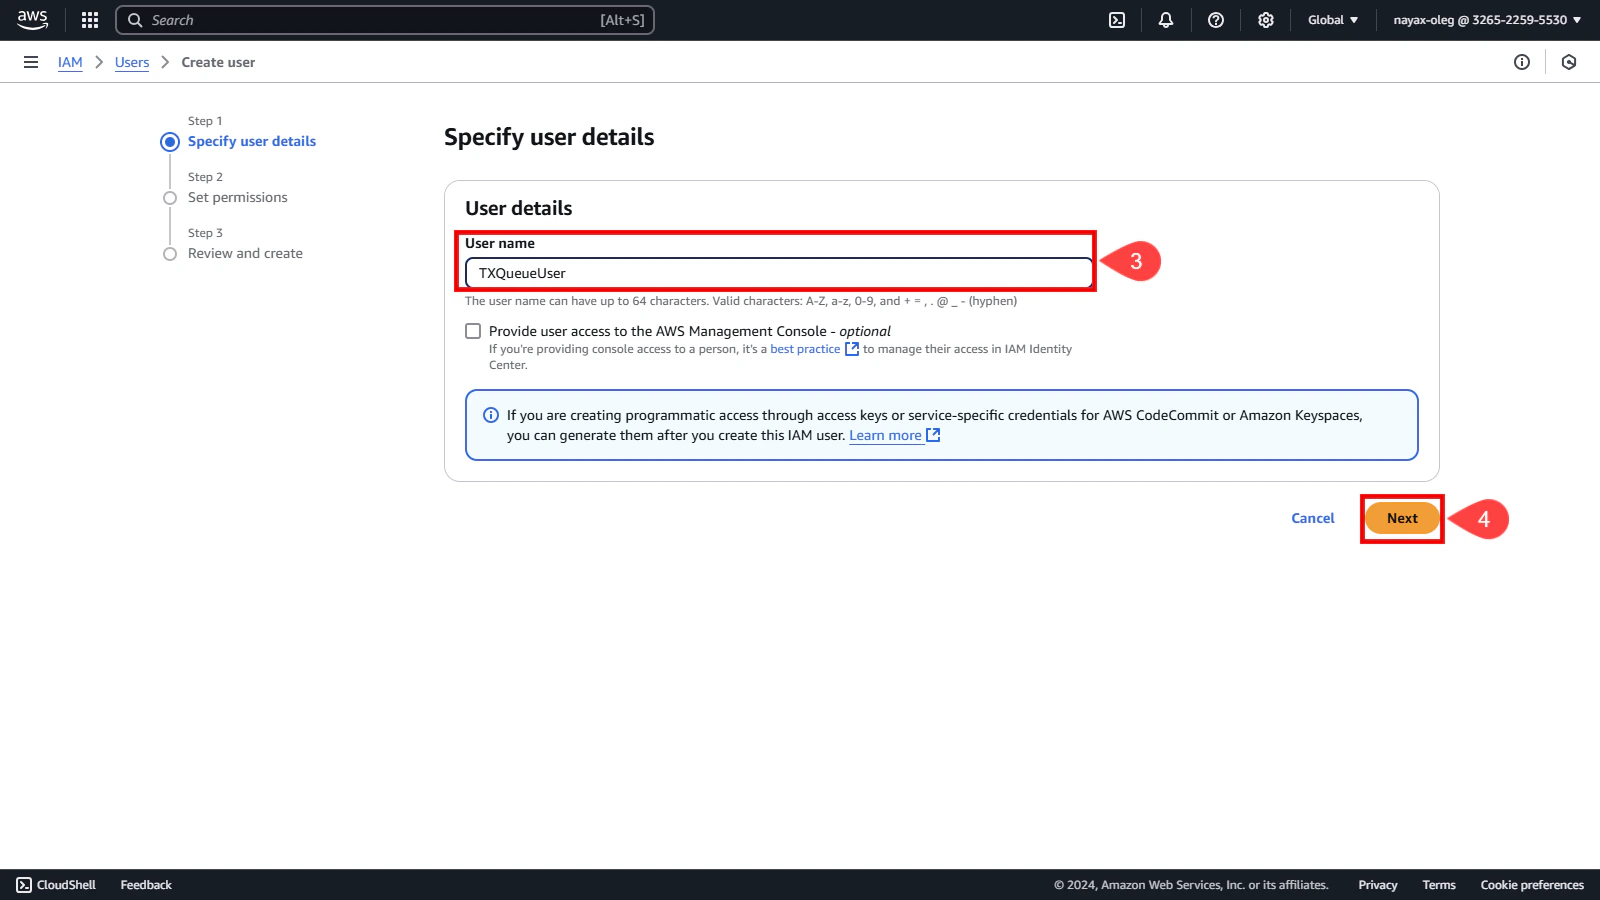
 3. Set a username for the user.
4. Click the **Next** button.
3. Set a username for the user.
4. Click the **Next** button.
 ## Set Permissions
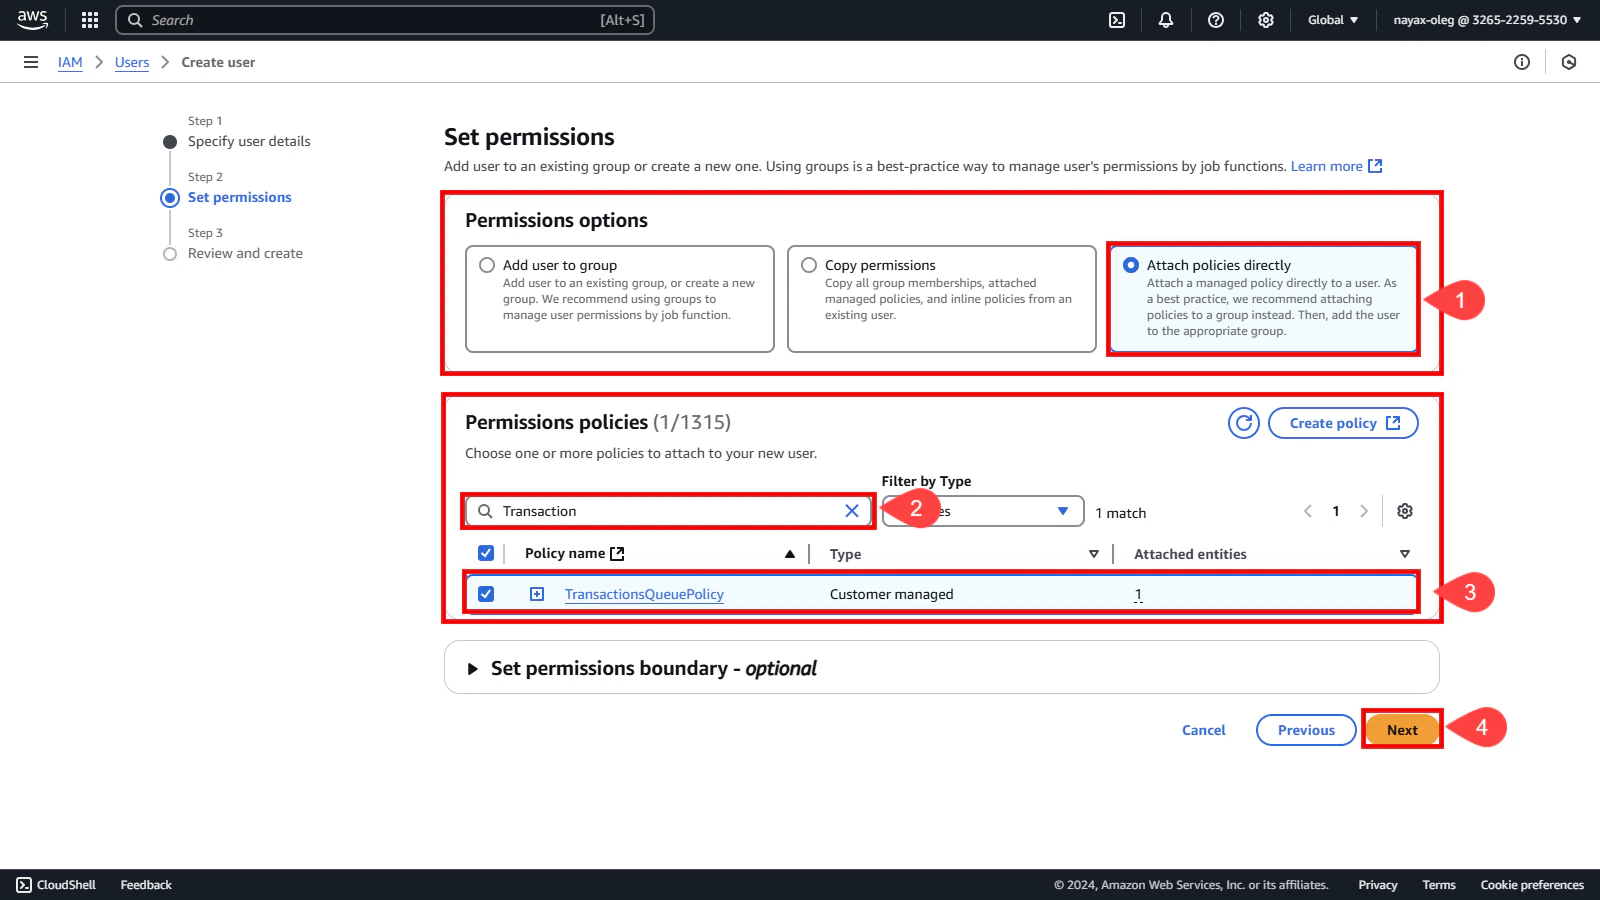
Attach the previously created policy to the user to grant the necessary permissions.
In the **Permissions options** section:
1. Select **Attach policies directly**.
In the **Permissions policies** section:
2. Filter policies by typing the policy name created earlier.
3. Select the policy created earlier.
4. Click the **Next** button.
## Set Permissions
Attach the previously created policy to the user to grant the necessary permissions.
In the **Permissions options** section:
1. Select **Attach policies directly**.
In the **Permissions policies** section:
2. Filter policies by typing the policy name created earlier.
3. Select the policy created earlier.
4. Click the **Next** button.
 ## Review and Create User
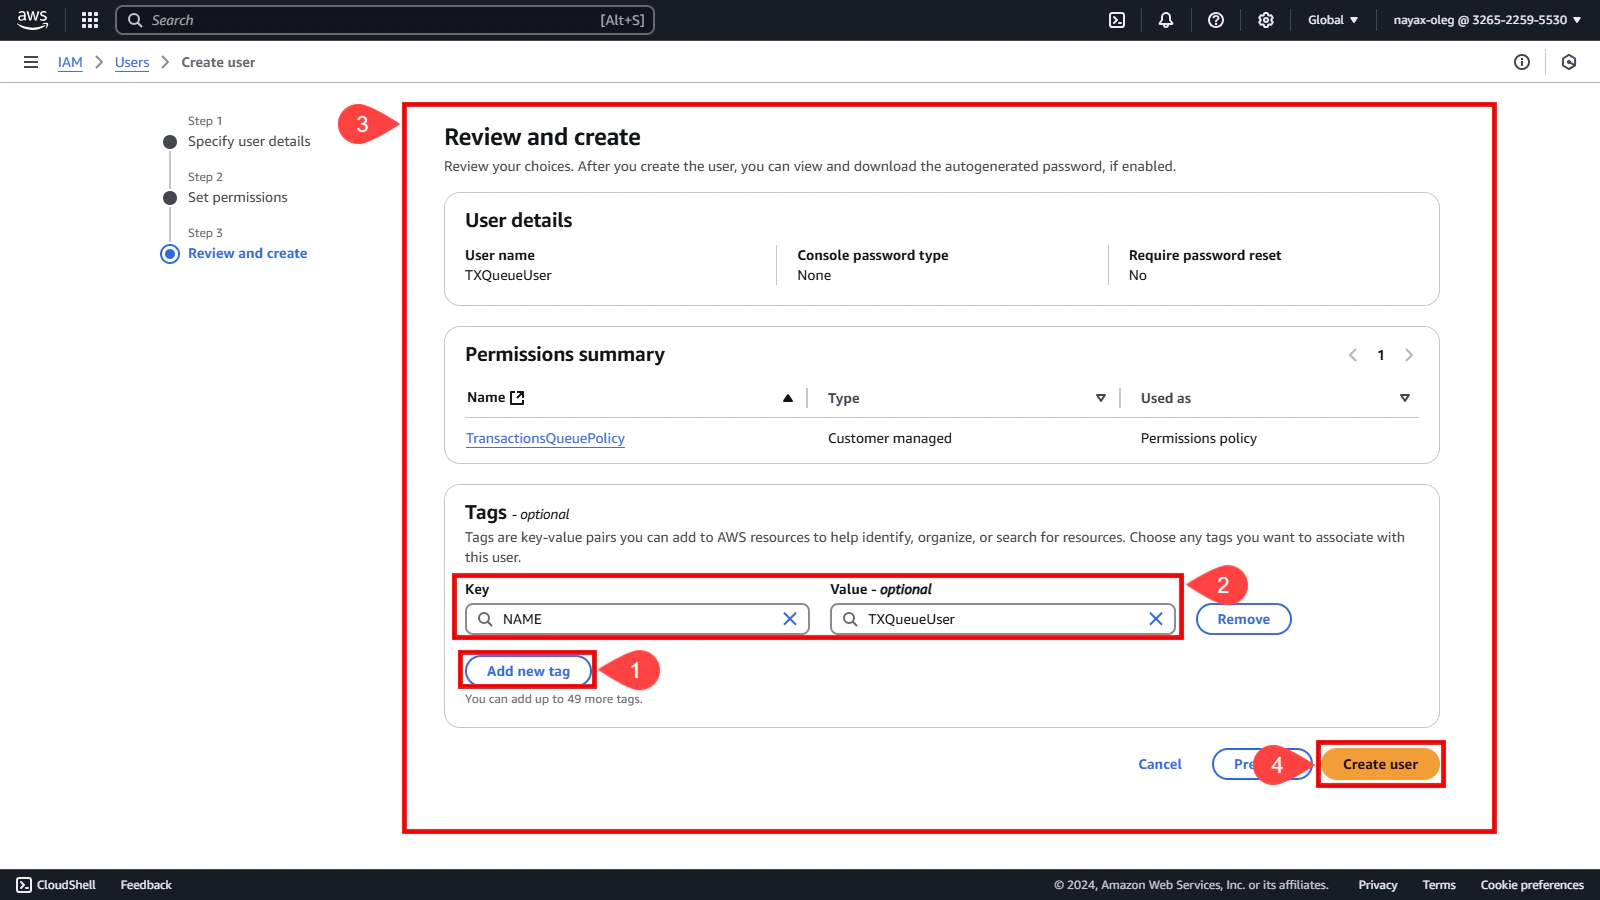
(Optional) AWS tags can help identify and track resource usage for pricing and management purposes:
1. Click the **Add new tag** button.
2. Add a tag with a key like **`NAME`** and a value for tracking resources.
3. Review all the settings to ensure they are correct.
4. Click the **Create User** button.
## Review and Create User
(Optional) AWS tags can help identify and track resource usage for pricing and management purposes:
1. Click the **Add new tag** button.
2. Add a tag with a key like **`NAME`** and a value for tracking resources.
3. Review all the settings to ensure they are correct.
4. Click the **Create User** button.
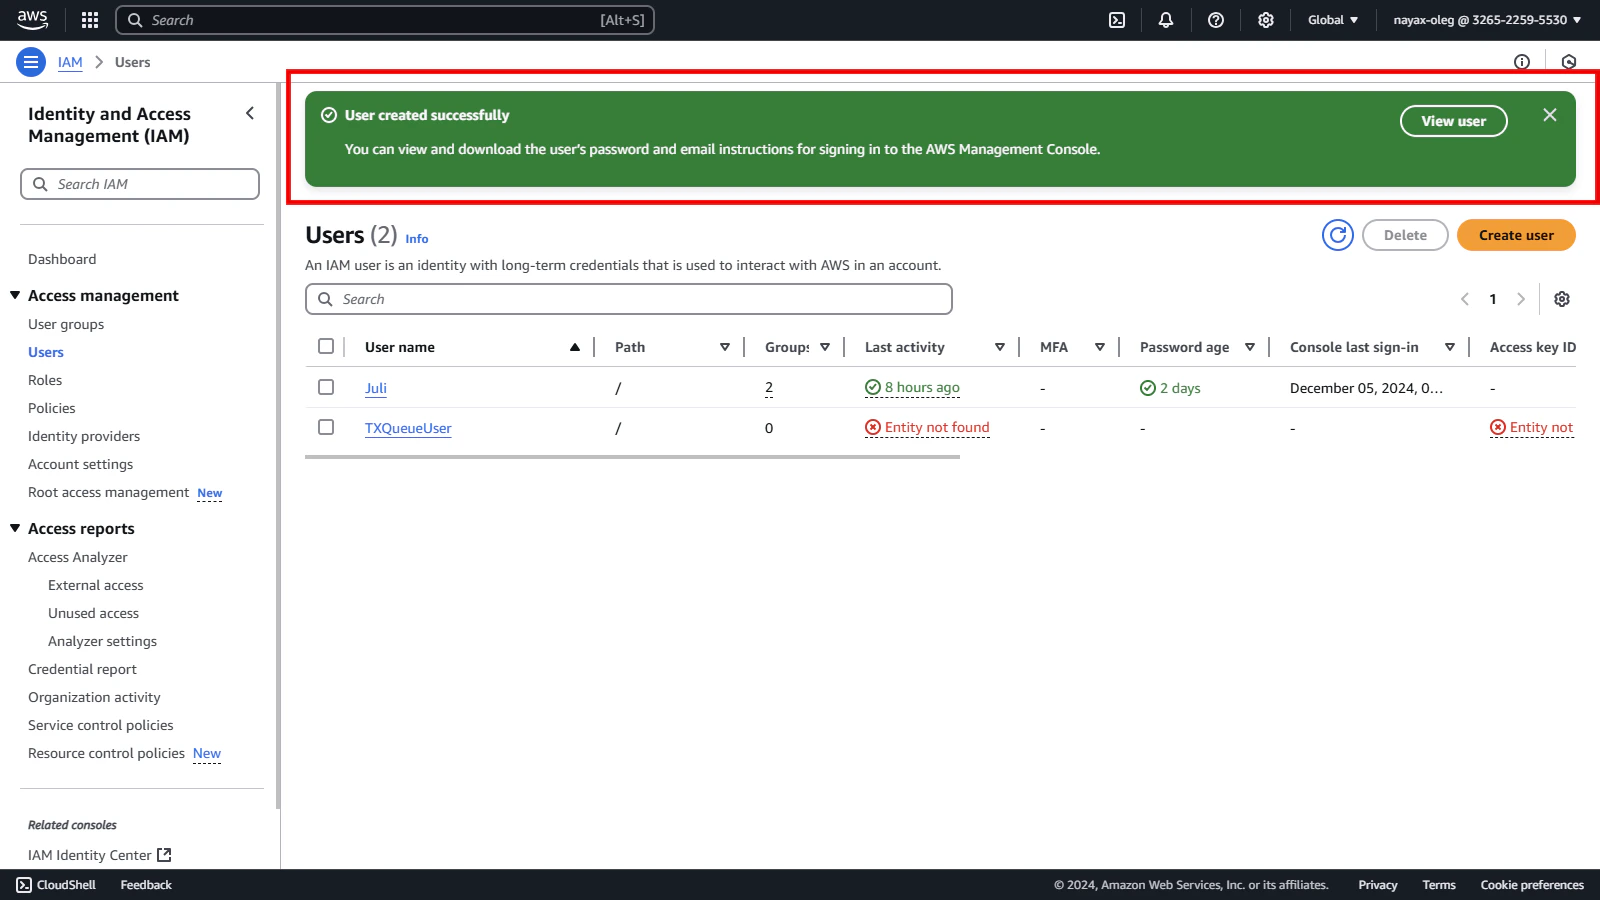
 Once the user is created, you will receive a confirmation message indicating successful setup.
 ## Assign Programmatic Access User
The next step in configuring programmatic access is generating access credentials for the created user. These credentials will allow interaction with the queue programmatically.
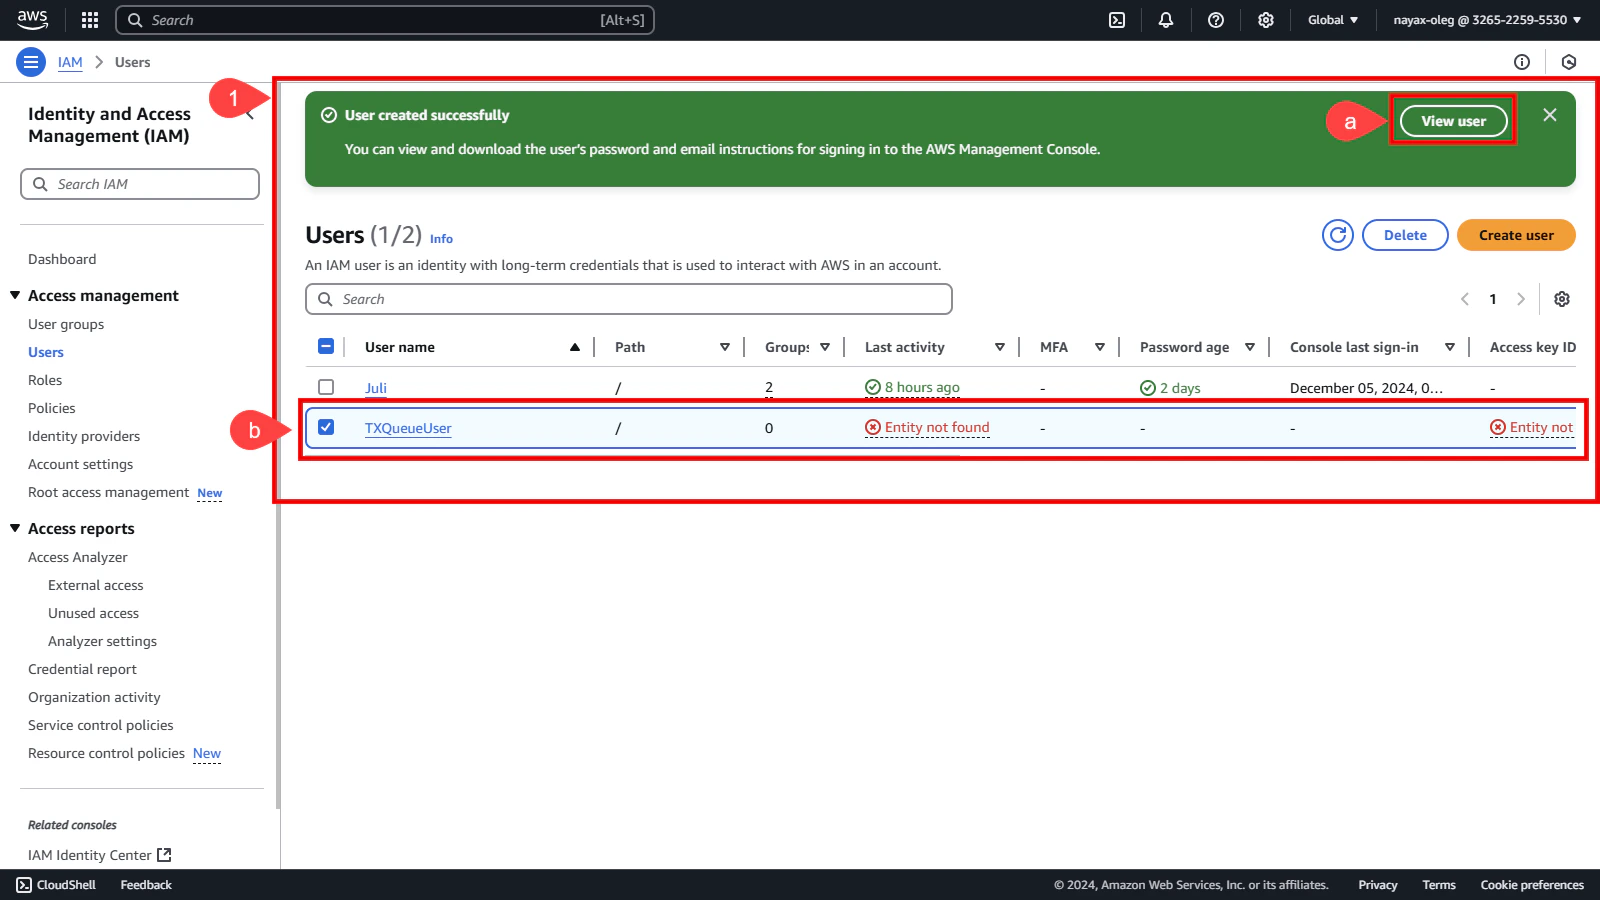
1. To view the user, you have 2 options:
a. Click the **View user button** located in the **User created successfully** note.
b. Select **TXQueueUser** in the User name column.
## Assign Programmatic Access User
The next step in configuring programmatic access is generating access credentials for the created user. These credentials will allow interaction with the queue programmatically.
1. To view the user, you have 2 options:
a. Click the **View user button** located in the **User created successfully** note.
b. Select **TXQueueUser** in the User name column.
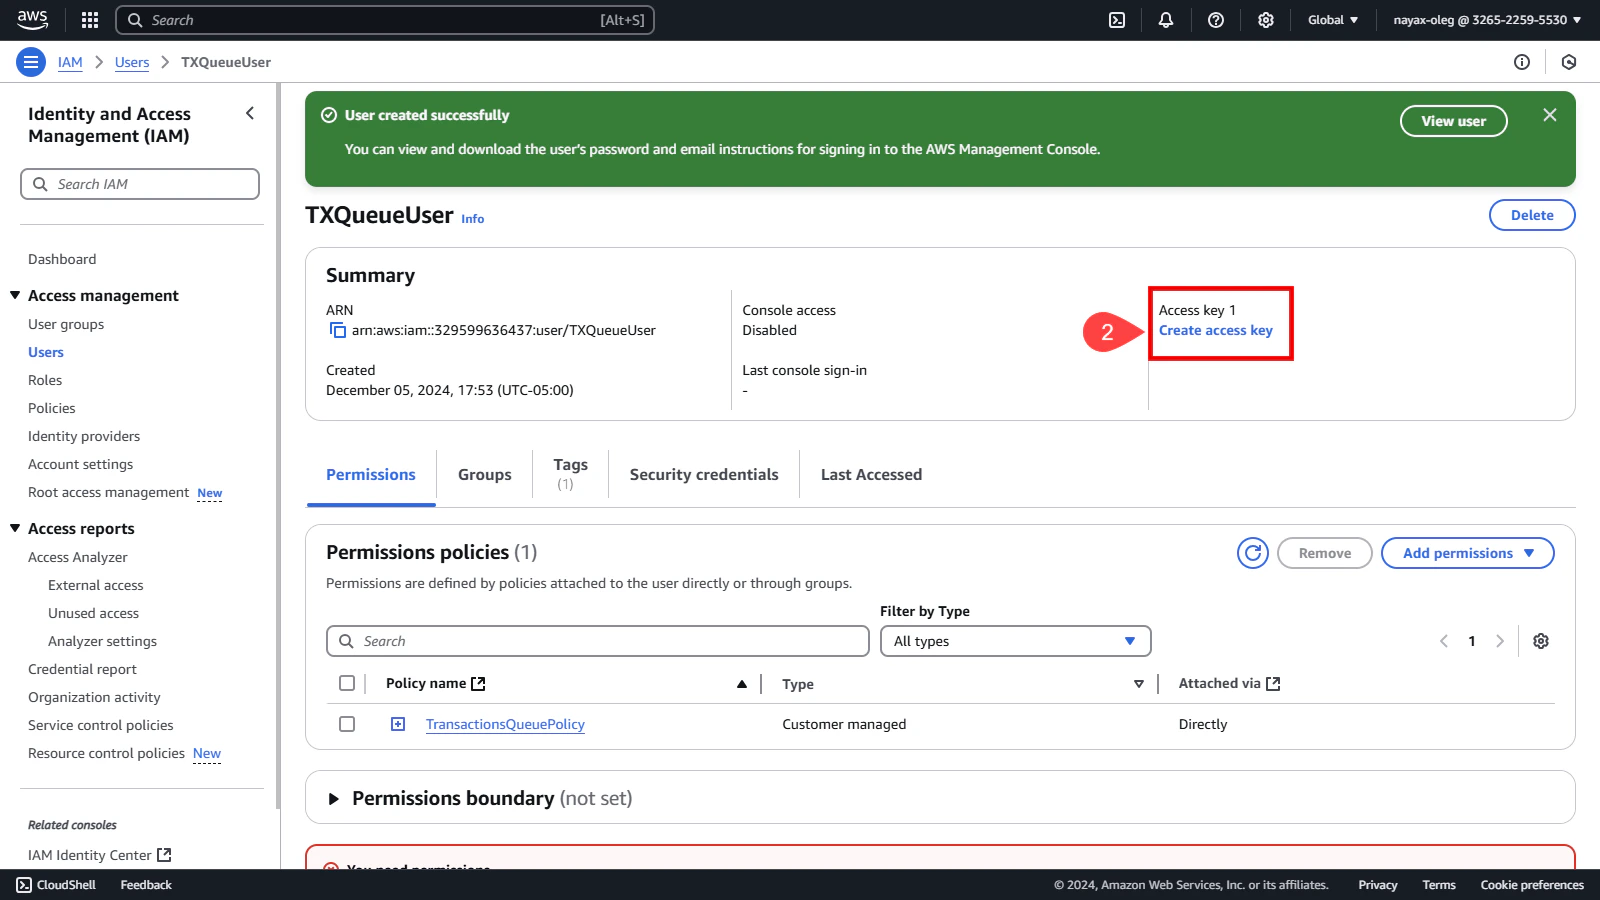
 2. Click **Create access key** in the Summary section.
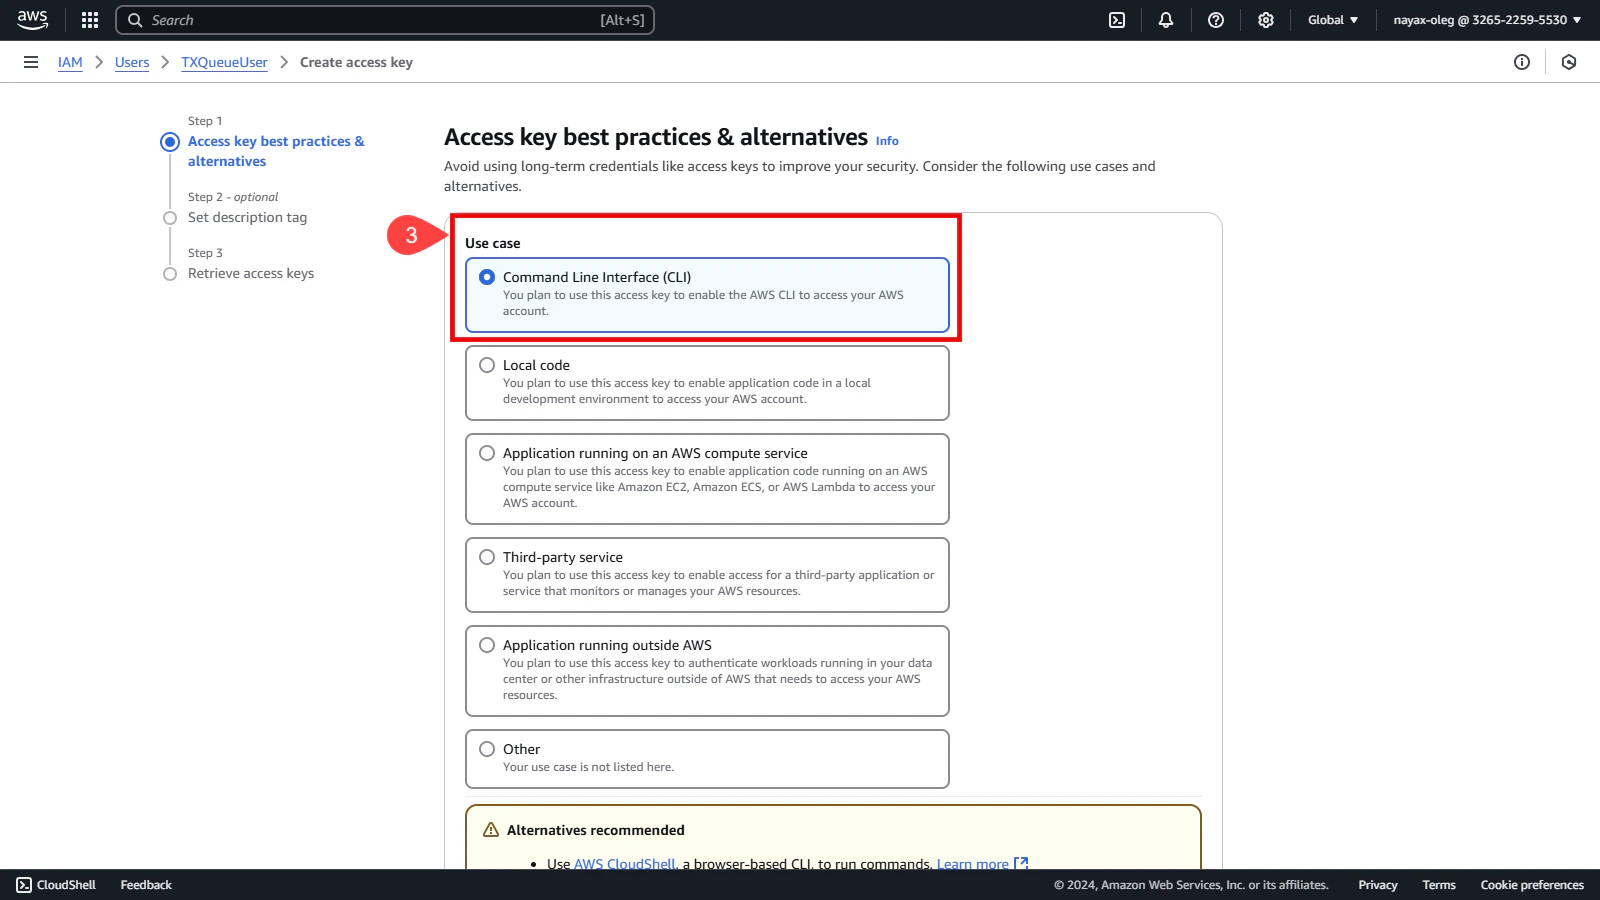
 3. Select the **Command Line Interface** option.
 4. Enable the checkbox to confirm your understanding of the recommendations.
5. Then, click the **Next** button.
4. Enable the checkbox to confirm your understanding of the recommendations.
5. Then, click the **Next** button.
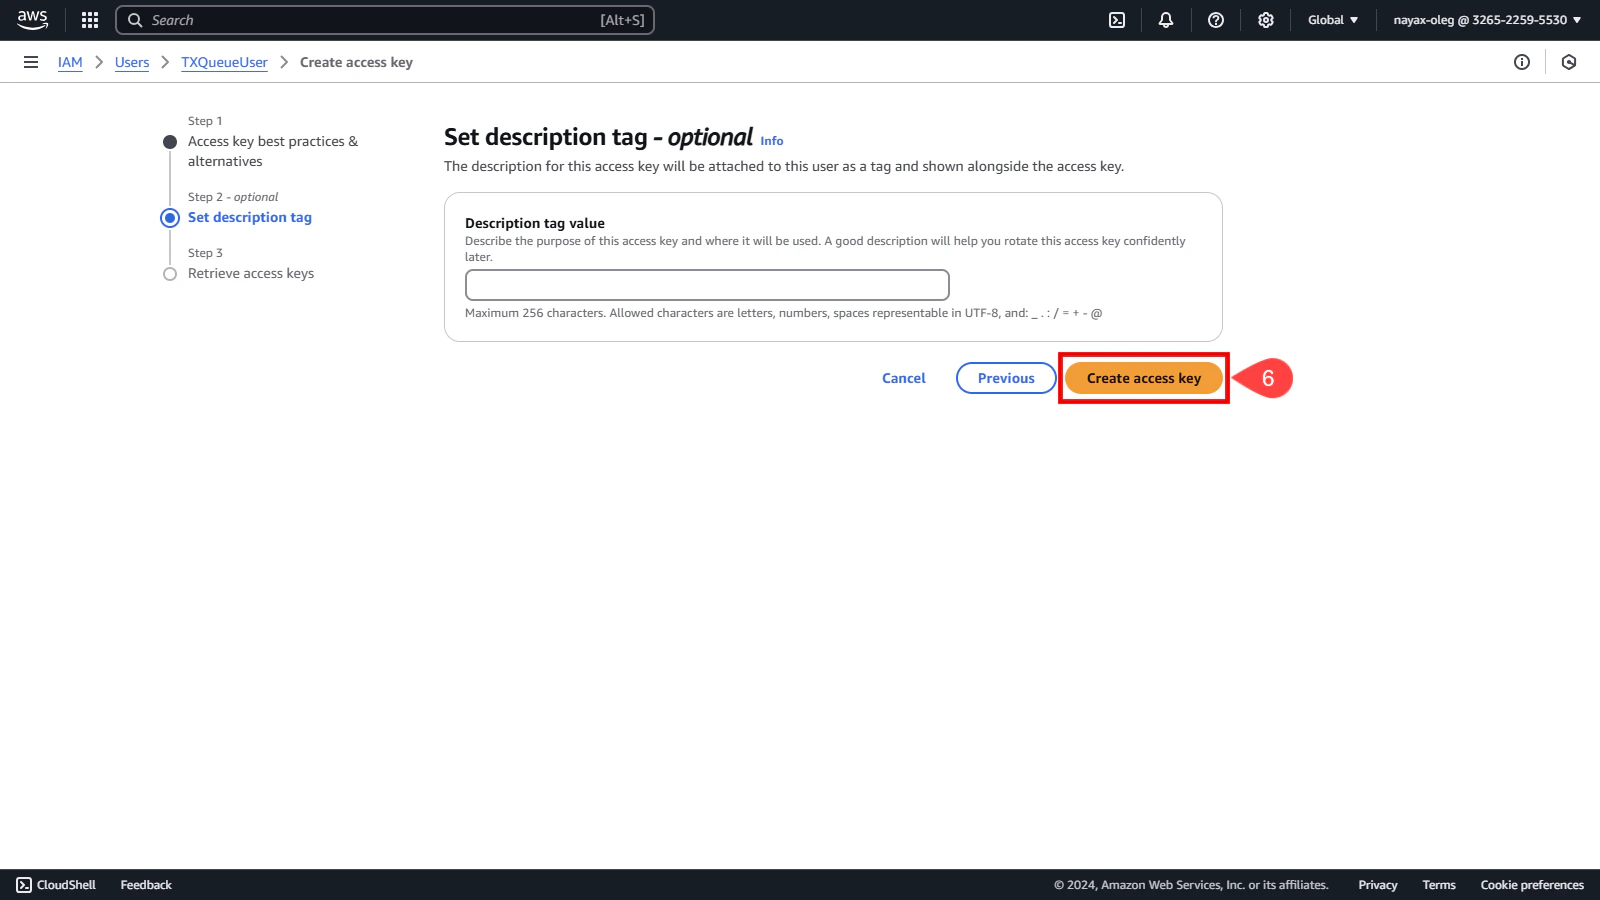
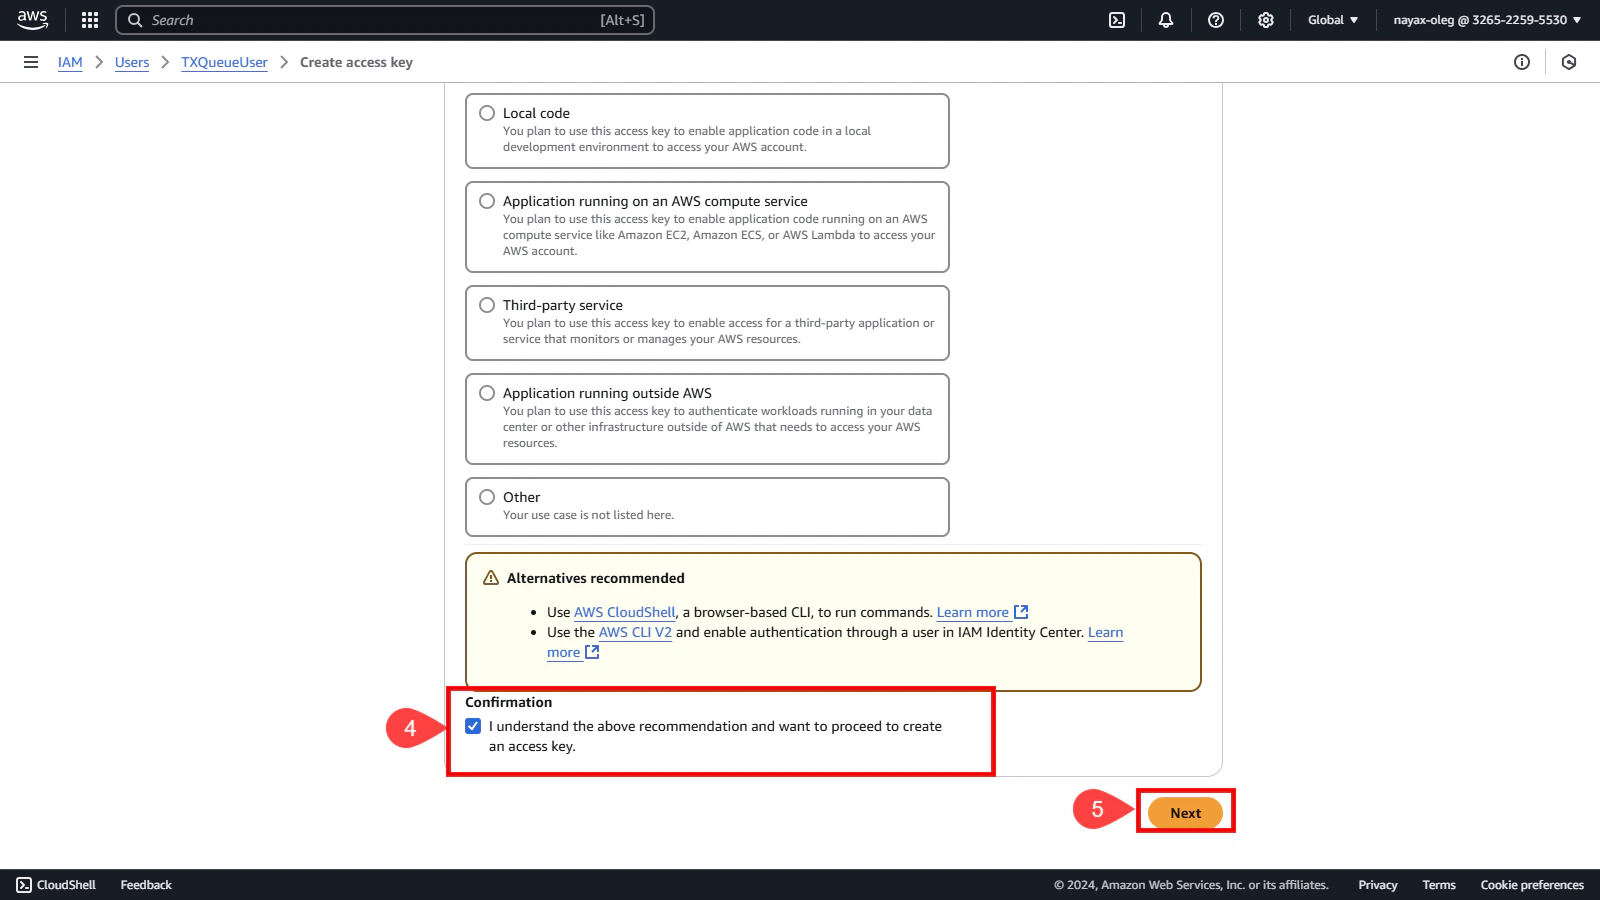 6. Finally, click the **Create access key** button.
 ## Save Access Credentials
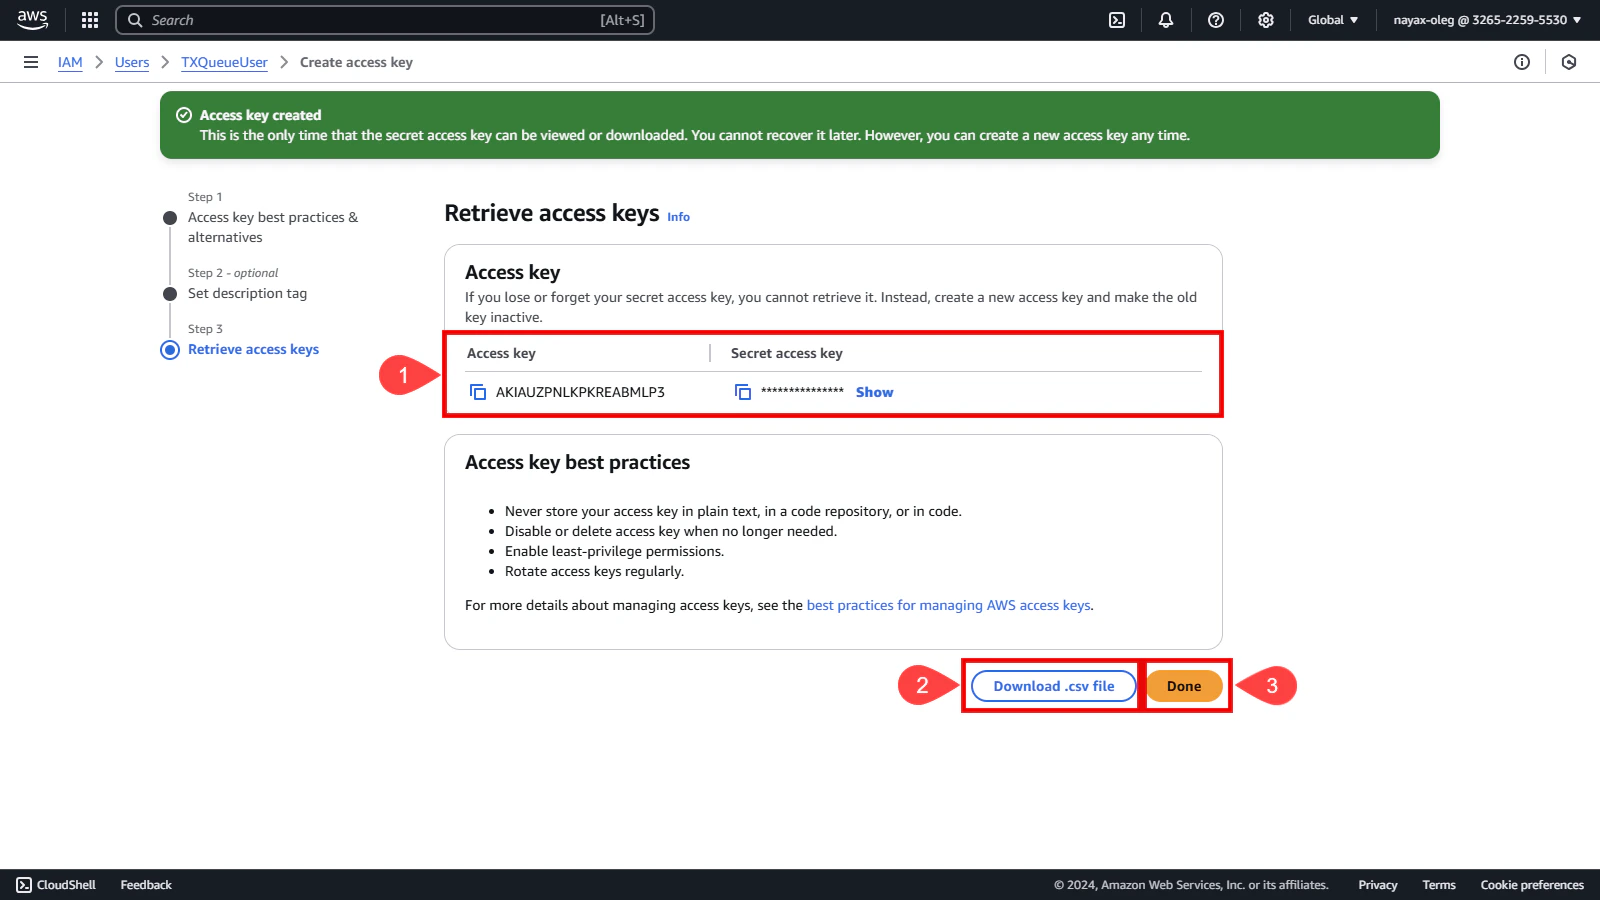
After creating the access key, you will be shown the **Access Key ID** and **Secret Access Key**, which are necessary for integration.
Perform one or both of the following actions:
1. Click Show to view the keys and manually copy them.
2. Click Download CSV to save the keys in a secure file.
It is recommended to do both.
**Credentials**
This is the last time these credentials will be available to download. However, you can create new credentials at any time.
3. Click the **Done** button.
## Save Access Credentials
After creating the access key, you will be shown the **Access Key ID** and **Secret Access Key**, which are necessary for integration.
Perform one or both of the following actions:
1. Click Show to view the keys and manually copy them.
2. Click Download CSV to save the keys in a secure file.
It is recommended to do both.
**Credentials**
This is the last time these credentials will be available to download. However, you can create new credentials at any time.
3. Click the **Done** button.
 ## Summary
Once completed, you will have the required credentials to access the queue.
The details necessary to continue the setup in the [**Nayax Core**](/docs/manage-data-operations/amazon-sqs/set-up-nayax-core/nayax-back-office-setup) are:
* **Queue URL**
* **Access Key ID**
* **Secret Access Key**
## Summary
Once completed, you will have the required credentials to access the queue.
The details necessary to continue the setup in the [**Nayax Core**](/docs/manage-data-operations/amazon-sqs/set-up-nayax-core/nayax-back-office-setup) are:
* **Queue URL**
* **Access Key ID**
* **Secret Access Key**