> ## Documentation Index
> Fetch the complete documentation index at: https://devzone.nayax.com/llms.txt
> Use this file to discover all available pages before exploring further.

# Add Credit to Card

export const EndpointCard = ({method = "API", title, children, href, arrow = true}) => {
  const METHOD_STYLES = {
    GET: {
      bg: "mint-bg-green-400/20 dark:mint-bg-green-400/20",
      text: "mint-text-green-700 dark:mint-text-green-400",
      border: "mint-border-green-300 dark:mint-border-green-700"
    },
    POST: {
      bg: "mint-bg-blue-400/20 dark:mint-bg-blue-400/20",
      text: "mint-text-blue-700 dark:mint-text-blue-400"
    },
    PUT: {
      bg: "mint-bg-yellow-400/20 dark:mint-bg-yellow-400/20",
      text: "mint-text-yellow-700 dark:mint-text-yellow-400"
    },
    PATCH: {
      bg: "mint-bg-orange-400/20 dark:mint-bg-orange-400/20",
      text: "mint-text-orange-700 dark:mint-text-orange-400"
    },
    DELETE: {
      bg: "mint-bg-red-400/20 dark:mint-bg-red-400/20",
      text: "mint-text-red-700 dark:mint-text-red-400"
    },
    API: {
      bg: "mint-bg-black",
      text: "mint-text-white"
    }
  };
  const MethodBadge = ({method}) => {
    const style = METHOD_STYLES[method?.toUpperCase()] ?? METHOD_STYLES.GET;
    return <span className={`
          method-pill rounded-lg font-bold px-1.5 py-0.5 text-xs leading-5 ${style.bg} ${style.text}`}>
        {method?.toUpperCase()}
      </span>;
  };
  const content = <div className="group flex items-center gap-4 border border-gray-200 dark:border-gray-700 rounded-xl p-5 bg-white dark:bg-[#1e1e1e] hover:border-gray-400 dark:hover:border-gray-500 hover:shadow-md transition-all cursor-pointer">
      {}
      <div className="flex-1 min-w-0">
        <p className="font-semibold text-gray-900 dark:text-white text-sm leading-snug">{title}</p>
        {children && <p className="mt-1 text-sm text-gray-500 dark:text-gray-400 line-clamp-2">{children}</p>}
      </div>

      {}
      <div className="shrink-0">
        <MethodBadge method={method} />
      </div>
    </div>;
  if (!href) return content;
  return <a href={href} className="block no-underline border-b-0 mb-2">
      {content}
    </a>;
};

This guide will walk you through adding credit to a card using the Lynx API. At the end, you’ll learn how to verify these changes in Nayax Core.

The following endpoint is used in this guide:

<EndpointCard title="Add Credit to a Card" href="/reference/lynx/cards/add-credit-to-a-card" method="post" />

<Warning>
  **Authentication**

  Refer to the [Security & Token](/docs/manage-data-operations/lynx-api/security) page of this documentation to learn how to access your tokens, and how to properly use it to authenticate your API requests.
</Warning>

## Methods to add credit to card

Adding credit to a card increases its available balance, allowing the cardholder to perform transactions. Lynx API offers a couple of ways to do so:

* **PUT Method**: With this option, you can use the same endpoints for creating or retrieving a card's data, but using a **PUT** request with the new amount of credit. For example, you can use the [Update Card by ID](/reference/lynx/cards/update-card-by-id) endpoint with the `CardID` in the URL and the updated credit amount in the body parameters.
* **POST Method**: Lynx API also offers a specific endpoint to perform a **POST** request with the credit to be added to a card. This is a much simpler option, since you will not have to deal with the bigger body objects the **PUT** Method has.

In this guide, we will explore the **POST** method to add credit to a card. But you can check the Updating Card Details page for more details on **PUT** requests.

## Adding credit

To add credit to a card you can use the **POST** method on the [Add Credit to a Card](/reference/lynx/cards/add-credit-to-a-card) endpoint. Sending the card's Unique Identifier in the URL. See the example query below:

<CodeGroup>
  ```sh Request theme={null}
  curl --request POST \
       --url 'https://qa-lynx.nayax.com/operational/v1/cards/{CardUniqueIdentifier}/credit/add?CardCredit=50&CreditChangeRemarks=Adding%20credit' \
       --header 'accept: application/json'
  ```

  ```json Response theme={null}
  {
    "value": 50
  }
  ```
</CodeGroup>

<Note>
  Replace `{CardUniqueIdentifier}` with the actual identifier of the card.
</Note>

The amount to add is sent on the query parameters, see the available parameters on the list below:

* `CardCredit`: The credit amount to be added.
* `CreditChangeRemarks`: A note about the transaction for tracking purposes.

## Verifying credit on Nayax Core

Once the request to add the card credit is successful, you can go to Nayax Core and check the card´s credit and history in the **Card Management** tab. Follow the steps below to do so.

1. Access your Nayax Core Dashboard

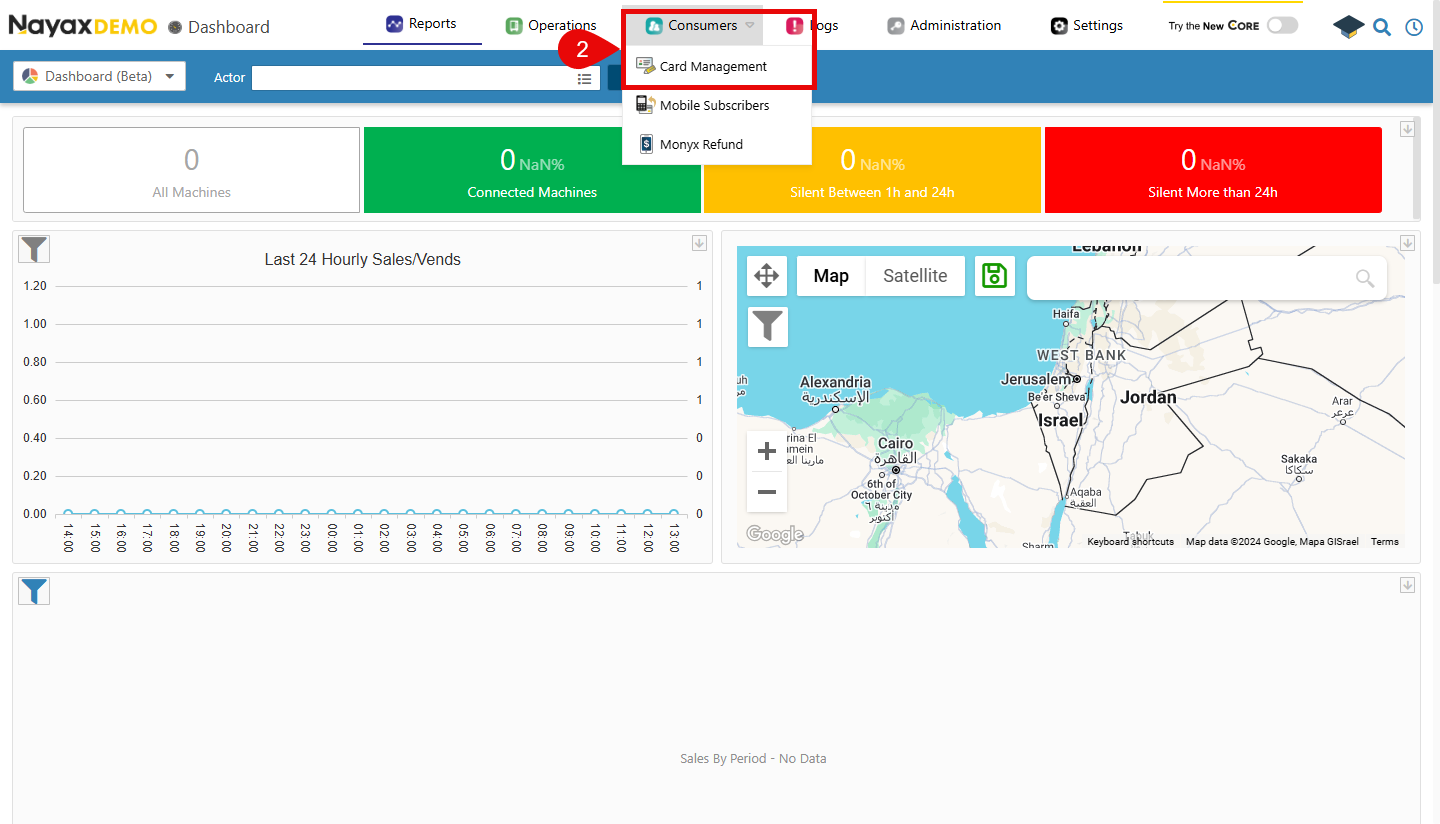
2. On the top menu, navigate to Consumers > Card Management

   <Frame>
     <img src="https://mintcdn.com/nayax-44d6e37b/1pW0jXOF4OhjjY4f/images/docs/add-credit-to-card/image1.png?fit=max&auto=format&n=1pW0jXOF4OhjjY4f&q=85&s=dc7fdec917b615b3196bbf0097a16076" width="1440" height="824" data-path="images/docs/add-credit-to-card/image1.png" />
   </Frame>

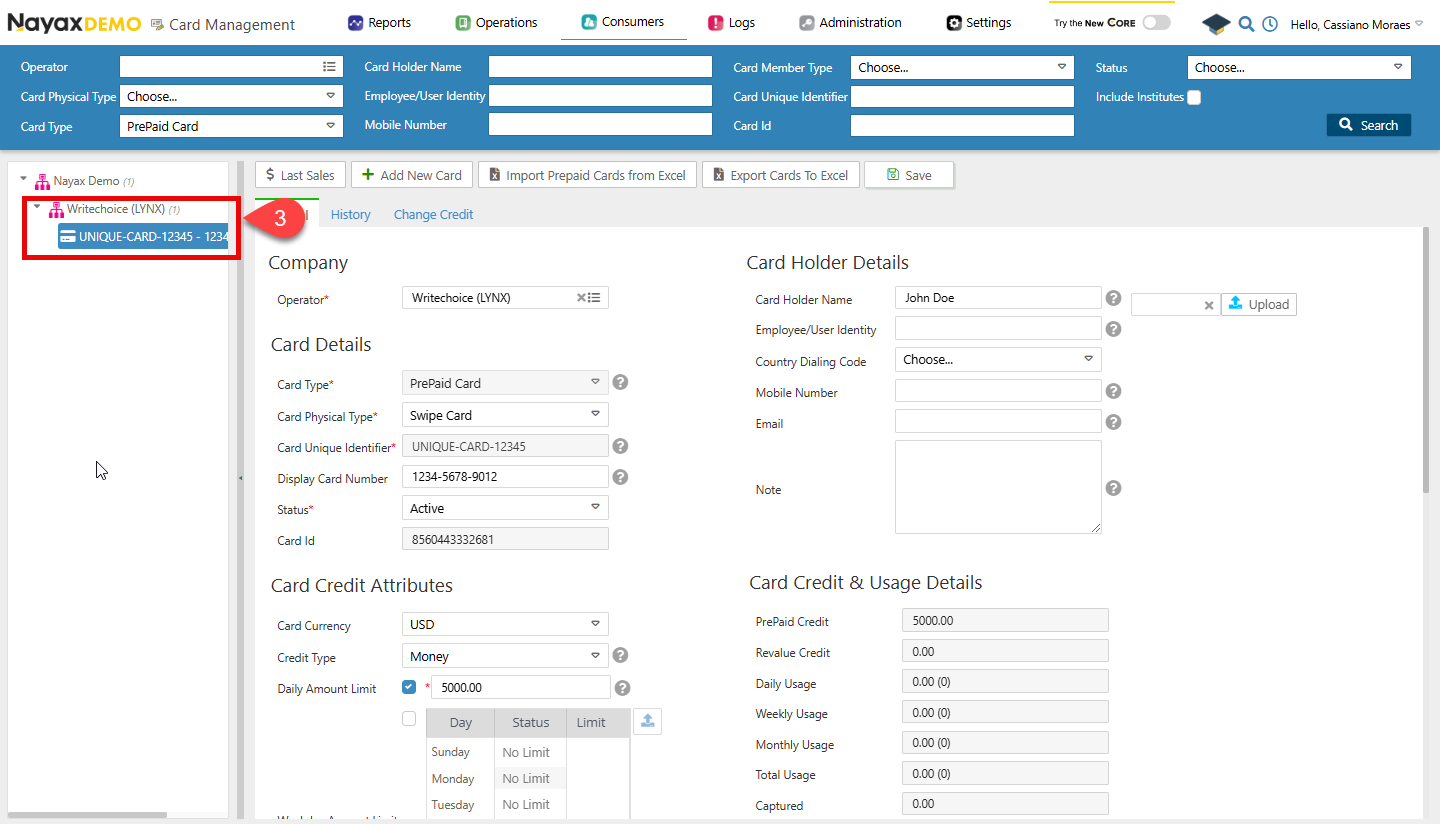
3. Search for the card to which the credit was added and select it.
   <Frame>
     <img src="https://mintcdn.com/nayax-44d6e37b/1pW0jXOF4OhjjY4f/images/docs/add-credit-to-card/image2.png?fit=max&auto=format&n=1pW0jXOF4OhjjY4f&q=85&s=8a418edb9c3c431df24ab71a0a271d16" width="1440" height="824" data-path="images/docs/add-credit-to-card/image2.png" />
   </Frame>

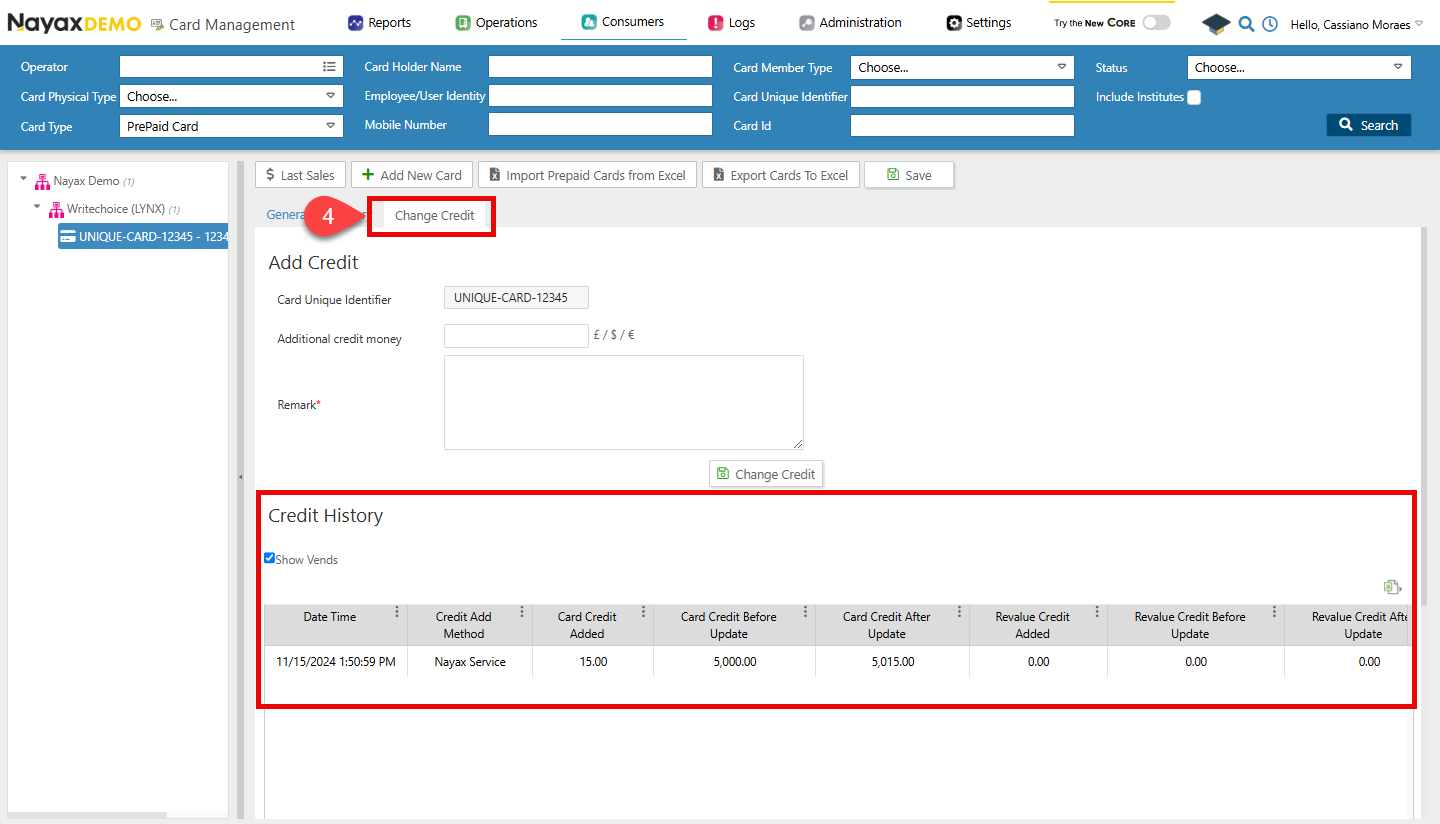
4. Open the **Change Credit** tab and check the **Credit History** section.
   <Frame>
     <img src="https://mintcdn.com/nayax-44d6e37b/1pW0jXOF4OhjjY4f/images/docs/add-credit-to-card/image3.png?fit=max&auto=format&n=1pW0jXOF4OhjjY4f&q=85&s=327b8ef5db910218e914945ad64a0f31" width="1440" height="824" data-path="images/docs/add-credit-to-card/image3.png" />
   </Frame>

There you will be able to see Credit History of the card and find the credit added through the Lynx API, and match the amount or remark to the ones sent in the request.

<br />