> ## Documentation Index
> Fetch the complete documentation index at: https://devzone.nayax.com/llms.txt
> Use this file to discover all available pages before exploring further.
# Machine Products
export const EndpointCard = ({method = "API", title, children, href, arrow = true}) => {
const METHOD_STYLES = {
GET: {
bg: "mint-bg-green-400/20 dark:mint-bg-green-400/20",
text: "mint-text-green-700 dark:mint-text-green-400",
border: "mint-border-green-300 dark:mint-border-green-700"
},
POST: {
bg: "mint-bg-blue-400/20 dark:mint-bg-blue-400/20",
text: "mint-text-blue-700 dark:mint-text-blue-400"
},
PUT: {
bg: "mint-bg-yellow-400/20 dark:mint-bg-yellow-400/20",
text: "mint-text-yellow-700 dark:mint-text-yellow-400"
},
PATCH: {
bg: "mint-bg-orange-400/20 dark:mint-bg-orange-400/20",
text: "mint-text-orange-700 dark:mint-text-orange-400"
},
DELETE: {
bg: "mint-bg-red-400/20 dark:mint-bg-red-400/20",
text: "mint-text-red-700 dark:mint-text-red-400"
},
API: {
bg: "mint-bg-black",
text: "mint-text-white"
}
};
const MethodBadge = ({method}) => {
const style = METHOD_STYLES[method?.toUpperCase()] ?? METHOD_STYLES.GET;
return
{method?.toUpperCase()}
;
};
const content =
{}
{title}
{children &&
{children}
}
{}
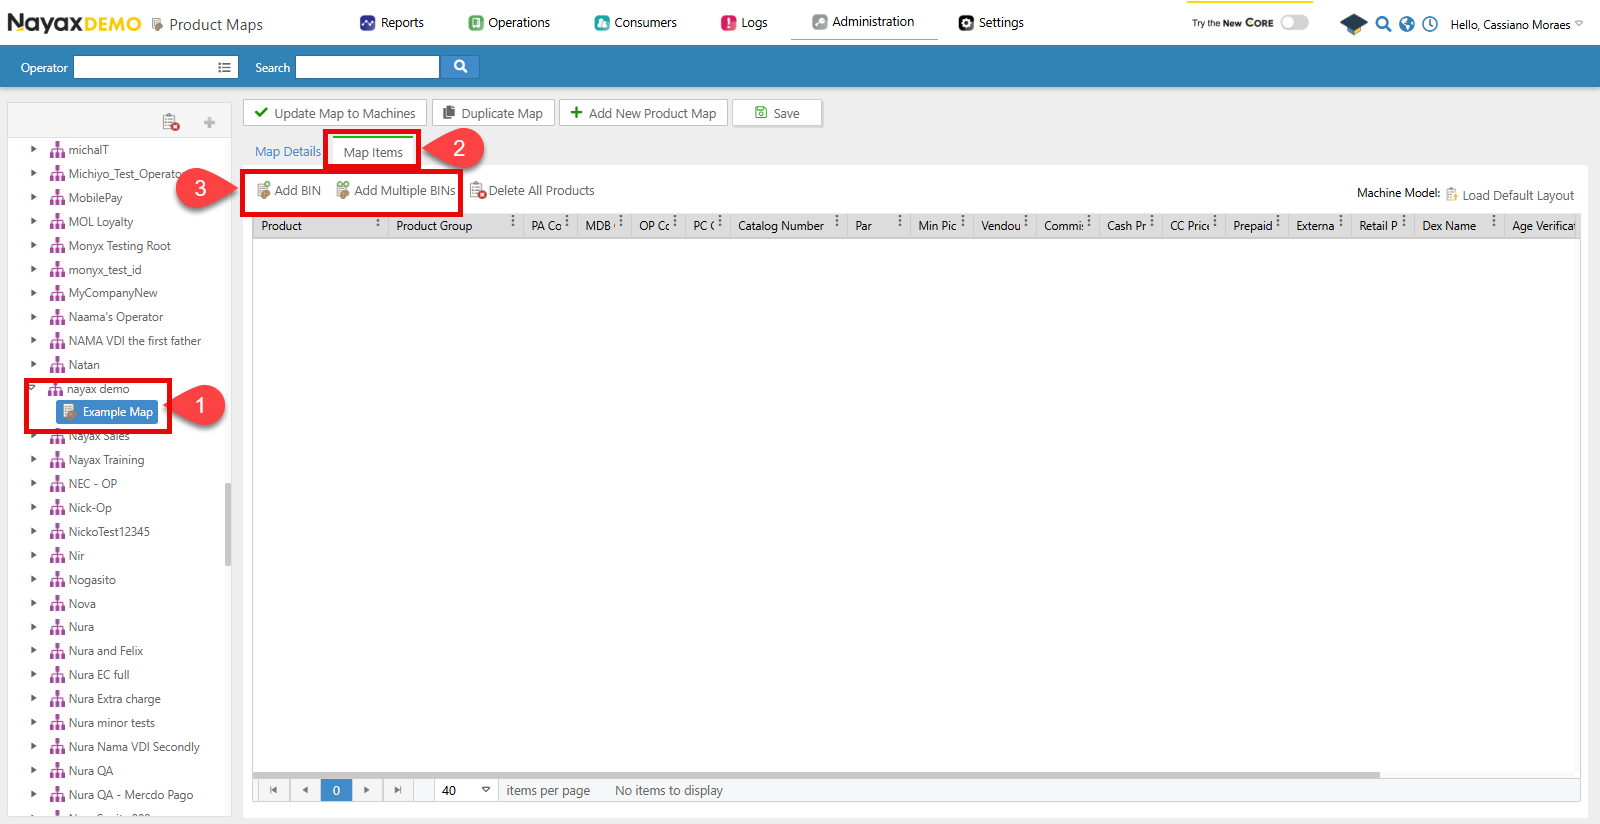
 Now, you can add products to this map. Follow the steps below to do so:
1. Select the map from the list.
2. Click on the **Map Items** tab.
3. Add products to the map using one of the following options:
* **Add BIN**: Adds one product directly to the list.
* **Add Multiple BINS**: Opens a pop-up window to select multiple products at once.
Now, you can add products to this map. Follow the steps below to do so:
1. Select the map from the list.
2. Click on the **Map Items** tab.
3. Add products to the map using one of the following options:
* **Add BIN**: Adds one product directly to the list.
* **Add Multiple BINS**: Opens a pop-up window to select multiple products at once.
 ## Add a machine product via API
Use the [Create Machine Products](/reference/lynx/machine-products/create-machine-products) endpoint to add one or more products to a machine's product map programmatically.
**Authentication**
Refer to the [Security & Token](/docs/manage-data-operations/lynx-api/security) page of this documentation to learn how to access your tokens, and how to properly use it to authenticate your API requests.
## Add a machine product via API
Use the [Create Machine Products](/reference/lynx/machine-products/create-machine-products) endpoint to add one or more products to a machine's product map programmatically.
**Authentication**
Refer to the [Security & Token](/docs/manage-data-operations/lynx-api/security) page of this documentation to learn how to access your tokens, and how to properly use it to authenticate your API requests.
Send a POST request with the `MachineID` as a path parameter and an array of product objects in the request body:
```sh Request theme={null}
curl --request POST \
--url https://qa-lynx.nayax.com/operational/v1/machines/{MachineID}/machineProducts \
--header 'accept: application/json' \
--header 'content-type: application/json' \
--data '
[
{
"NayaxProductID": 0,
"MDBCode": 0,
"PAR": 0,
"CashPrice": 0,
"CreditCardPrice": 0,
"MachinePrice": 0,
"RetailPrice": 0,
"DEXProductName": "string",
"PACode": "string",
"PCCode": "string",
"ProductMinimumPickQTY": 0,
"VendOutAlertThreshold": 0,
"PrePaidCardPrice": 0,
"OperatorButtonCode": "string",
"CommissionValue": 0,
"ExternalPrepaidPrice": 0
}
]
'
```
You can add more than one product object in the array to add multiple products to the map in a single request.
**Path Params**
Change the `MachineID` with the unique identifier of the machine to map its products.
In the body parameters, fill in the following:
| Parameter | Description |
| ----------------------- | -------------------------------------------------------------------------- |
| `NayaxProductID` | A unique identifier for the product in the Nayax system. |
| `MDBCode` | The MDB (Multi-Drop Bus) code associated with the product. |
| `PAR` | The price adjustment ratio for the product. |
| `CashPrice` | The price of the product when purchased with cash. |
| `CreditCardPrice` | The price of the product when purchased with a credit card. |
| `MachinePrice` | The price of the product set directly on the vending machine. |
| `RetailPrice` | The suggested retail price of the product. |
| `DEXProductName` | The product name as it appears in the DEX (Data Exchange) format. |
| `PACode` | The PA (Price Adjustment) code associated with the product. |
| `PCCode` | The PC (Product Category) code associated with the product. |
| `ProductMinimumPickQTY` | The minimum quantity of the product required for restocking or picking. |
| `VendOutAlertThreshold` | The stock level threshold that triggers a vend-out alert. |
| `PrePaidCardPrice` | The price of the product when purchased using a prepaid card. |
| `OperatorButtonCode` | The code used by the operator to select the product manually. |
| `CommissionValue` | The commission value associated with the product. |
| `ExternalPrepaidPrice` | The price of the product when purchased with an external prepaid solution. |
After mapping products to your machines, you're ready to [generate pick lists](/docs/manage-data-operations/lynx-api/inventory-management/pick-lists).