> ## Documentation Index
> Fetch the complete documentation index at: https://devzone.nayax.com/llms.txt
> Use this file to discover all available pages before exploring further.
# Create Operator
export const EndpointCard = ({method = "API", title, children, href, arrow = true}) => {
const METHOD_STYLES = {
GET: {
bg: "mint-bg-green-400/20 dark:mint-bg-green-400/20",
text: "mint-text-green-700 dark:mint-text-green-400",
border: "mint-border-green-300 dark:mint-border-green-700"
},
POST: {
bg: "mint-bg-blue-400/20 dark:mint-bg-blue-400/20",
text: "mint-text-blue-700 dark:mint-text-blue-400"
},
PUT: {
bg: "mint-bg-yellow-400/20 dark:mint-bg-yellow-400/20",
text: "mint-text-yellow-700 dark:mint-text-yellow-400"
},
PATCH: {
bg: "mint-bg-orange-400/20 dark:mint-bg-orange-400/20",
text: "mint-text-orange-700 dark:mint-text-orange-400"
},
DELETE: {
bg: "mint-bg-red-400/20 dark:mint-bg-red-400/20",
text: "mint-text-red-700 dark:mint-text-red-400"
},
API: {
bg: "mint-bg-black",
text: "mint-text-white"
}
};
const MethodBadge = ({method}) => {
const style = METHOD_STYLES[method?.toUpperCase()] ?? METHOD_STYLES.GET;
return
{method?.toUpperCase()}
;
};
const content =
{}
{title}
{children &&
{children}
}
{}
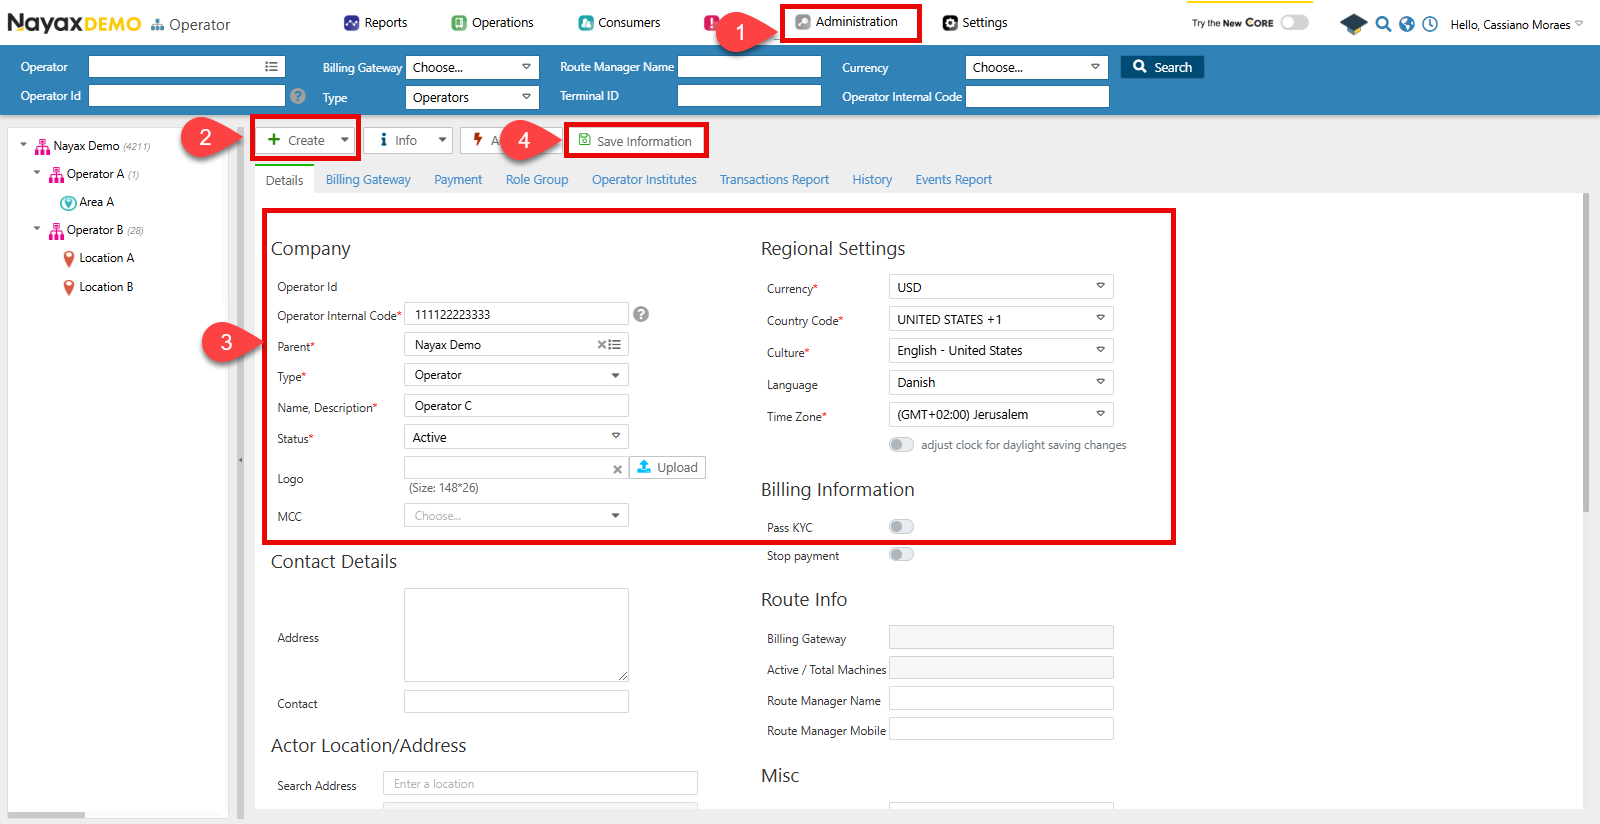 **Actor Types**
Note that when you create an actor directly below the distributor, there are only two types available: Institute or Operator. To create Routes, Area, or Location actor types, they must be below an actor with the Operator type.
## Lynx API
This process can also be done programmatically through Lynx API with a POST request to the following endpoint:
**Actor Types**
Note that when you create an actor directly below the distributor, there are only two types available: Institute or Operator. To create Routes, Area, or Location actor types, they must be below an actor with the Operator type.
## Lynx API
This process can also be done programmatically through Lynx API with a POST request to the following endpoint:
**Authentication**
Refer to the [Security & Token](/docs/manage-data-operations/lynx-api/security) page of this documentation to learn how to access your tokens, and how to properly use it to authenticate your API requests.
### Create operator request
The [Create New Actor ](/reference/lynx/actors/create-a-new-actor-1)endpoint allows for registering a new operator in the Nayax system. See the example request in the code block below:
```sh Request theme={null}
curl --request POST \
--url https://qa-lynx.nayax.com/operational/v1/actors/{ParentActorID} \
--header 'Authorization: Bearer ' \
--header 'accept: application/json' \
--header 'Content-Type: application/json' \
--data '{
"ActorDescription": "Main Branch",
"ActorCode": 1001,
"ActorAddress": "123 Main Street, Metropolis",
"ActorContact": "contact@branch.com",
"ActorTypeID": 16,
"ActorStatus": 1,
"CurrencyID": 840,
"CountryID": 840,
"ActorMerchantBit": true,
"ActorCreationDate": "2024-11-25T12:00:00Z",
"ActorLanguageID": 7,
"GeoCity": "Metropolis",
"GeoLongitude": -77.0364,
"GeoLatitude": 38.8951
}'
```
**Path Params**
Change the `ParentActorID` with the unique identifier of the parent actor under which the new operator will be created.
In the body parameters, fill in the following:
| **Parameter** | `Type` | Description |
| --------------------- | ---------------- | --------------------------------------------------------------------------------- |
| **ParentActorID** | `int64/null` | The unique identifier of the parent actor is if this actor is a sub-entity. |
| **ActorID** | `int64/null` | The unique identifier for the actor. |
| **ActorDescription** | `string/null` | A brief description of the actor. |
| **ActorCode** | `int64/null` | A code representing the actor is often used for identification or categorization. |
| **ActorAddress** | `string/null` | The physical address associated with the actor. |
| **ActorContact** | `string/null` | Contact information for the actor, such as a phone number or email. |
| **ActorTypeID** | `int32/null` | The identifier represents the type of actor. |
| **ActorStatus** | `int32/null` | The current status of the actor. |
| **CurrencyID** | `int32/null` | The currency identifier used by the actor for transactions. |
| **CountryID** | `int32/null` | The identifier for the country in which the actor is located. |
| **ActorMerchantBit** | `boolean/null` | Indicates whether the actor is associated with a merchant. |
| **ActorLanguageID** | `int32/null` | The language preference of the actor. |
| **GeoCity** | `string/null` | The city where the actor is located. |
| **GeoLongitude** | `double/null` | The geographic longitude of the actor's location. |
| **GeoLatitude** | `double/null` | The geographic latitude of the actor's location. |
| **ActorCreationDate** | `date-time/null` | The date and time when this actor was created. |
A successful request will return a response with the created operator details.
## Verify creation
You can check if your operator was correctly created in Nayax Core in the `Operators` menu.
1. Use the **Search** function to filter your operator.
2. Select it from the list.
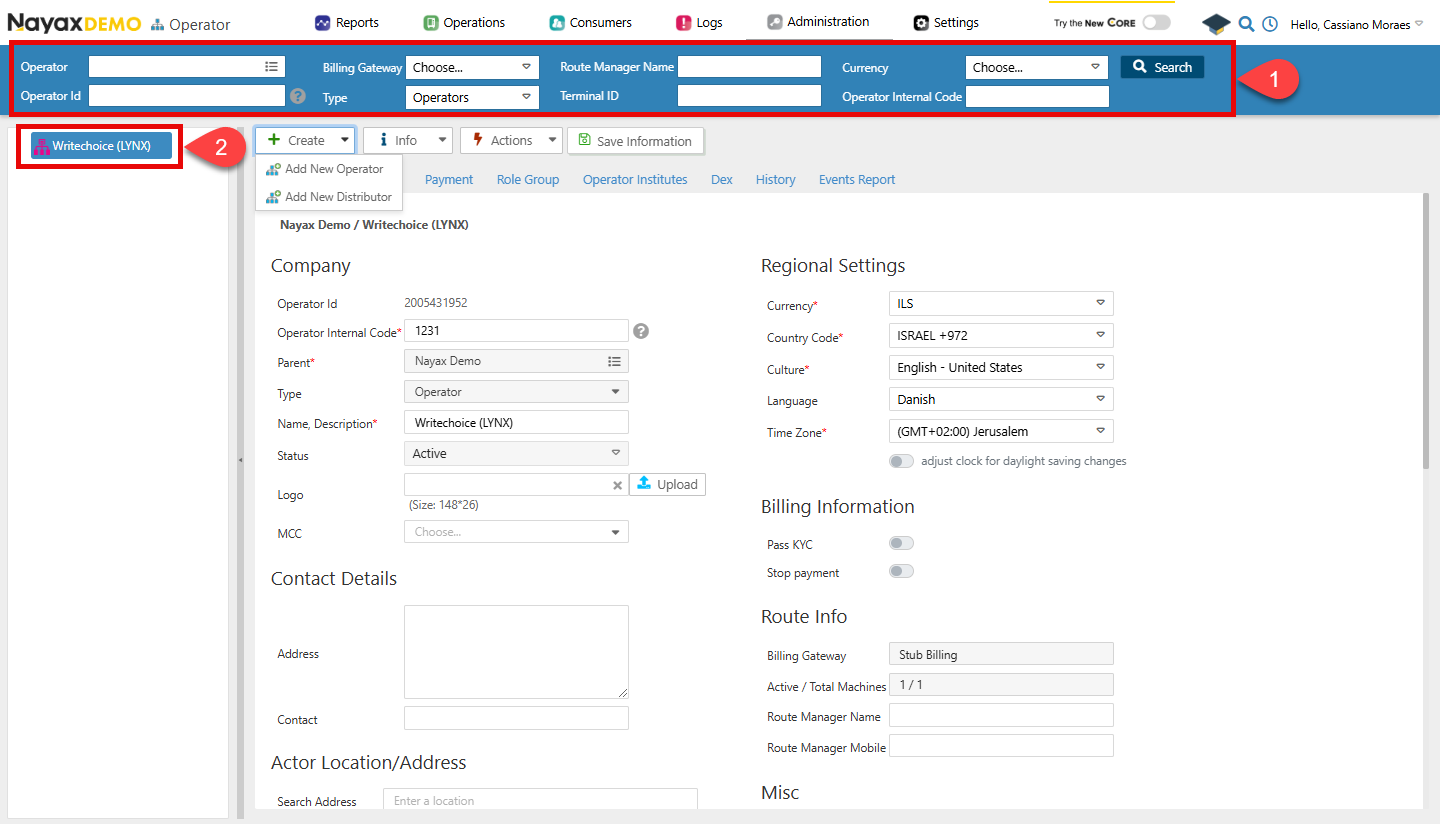 You can see all the operator information in the **Details** tab.