> ## Documentation Index
> Fetch the complete documentation index at: https://devzone.nayax.com/llms.txt
> Use this file to discover all available pages before exploring further.
# Request Refunds
export const EndpointCard = ({method = "API", title, children, href, arrow = true}) => {
const METHOD_STYLES = {
GET: {
bg: "mint-bg-green-400/20 dark:mint-bg-green-400/20",
text: "mint-text-green-700 dark:mint-text-green-400",
border: "mint-border-green-300 dark:mint-border-green-700"
},
POST: {
bg: "mint-bg-blue-400/20 dark:mint-bg-blue-400/20",
text: "mint-text-blue-700 dark:mint-text-blue-400"
},
PUT: {
bg: "mint-bg-yellow-400/20 dark:mint-bg-yellow-400/20",
text: "mint-text-yellow-700 dark:mint-text-yellow-400"
},
PATCH: {
bg: "mint-bg-orange-400/20 dark:mint-bg-orange-400/20",
text: "mint-text-orange-700 dark:mint-text-orange-400"
},
DELETE: {
bg: "mint-bg-red-400/20 dark:mint-bg-red-400/20",
text: "mint-text-red-700 dark:mint-text-red-400"
},
API: {
bg: "mint-bg-black",
text: "mint-text-white"
}
};
const MethodBadge = ({method}) => {
const style = METHOD_STYLES[method?.toUpperCase()] ?? METHOD_STYLES.GET;
return
{method?.toUpperCase()}
;
};
const content =
{}
{title}
{children &&
{children}
}
{}
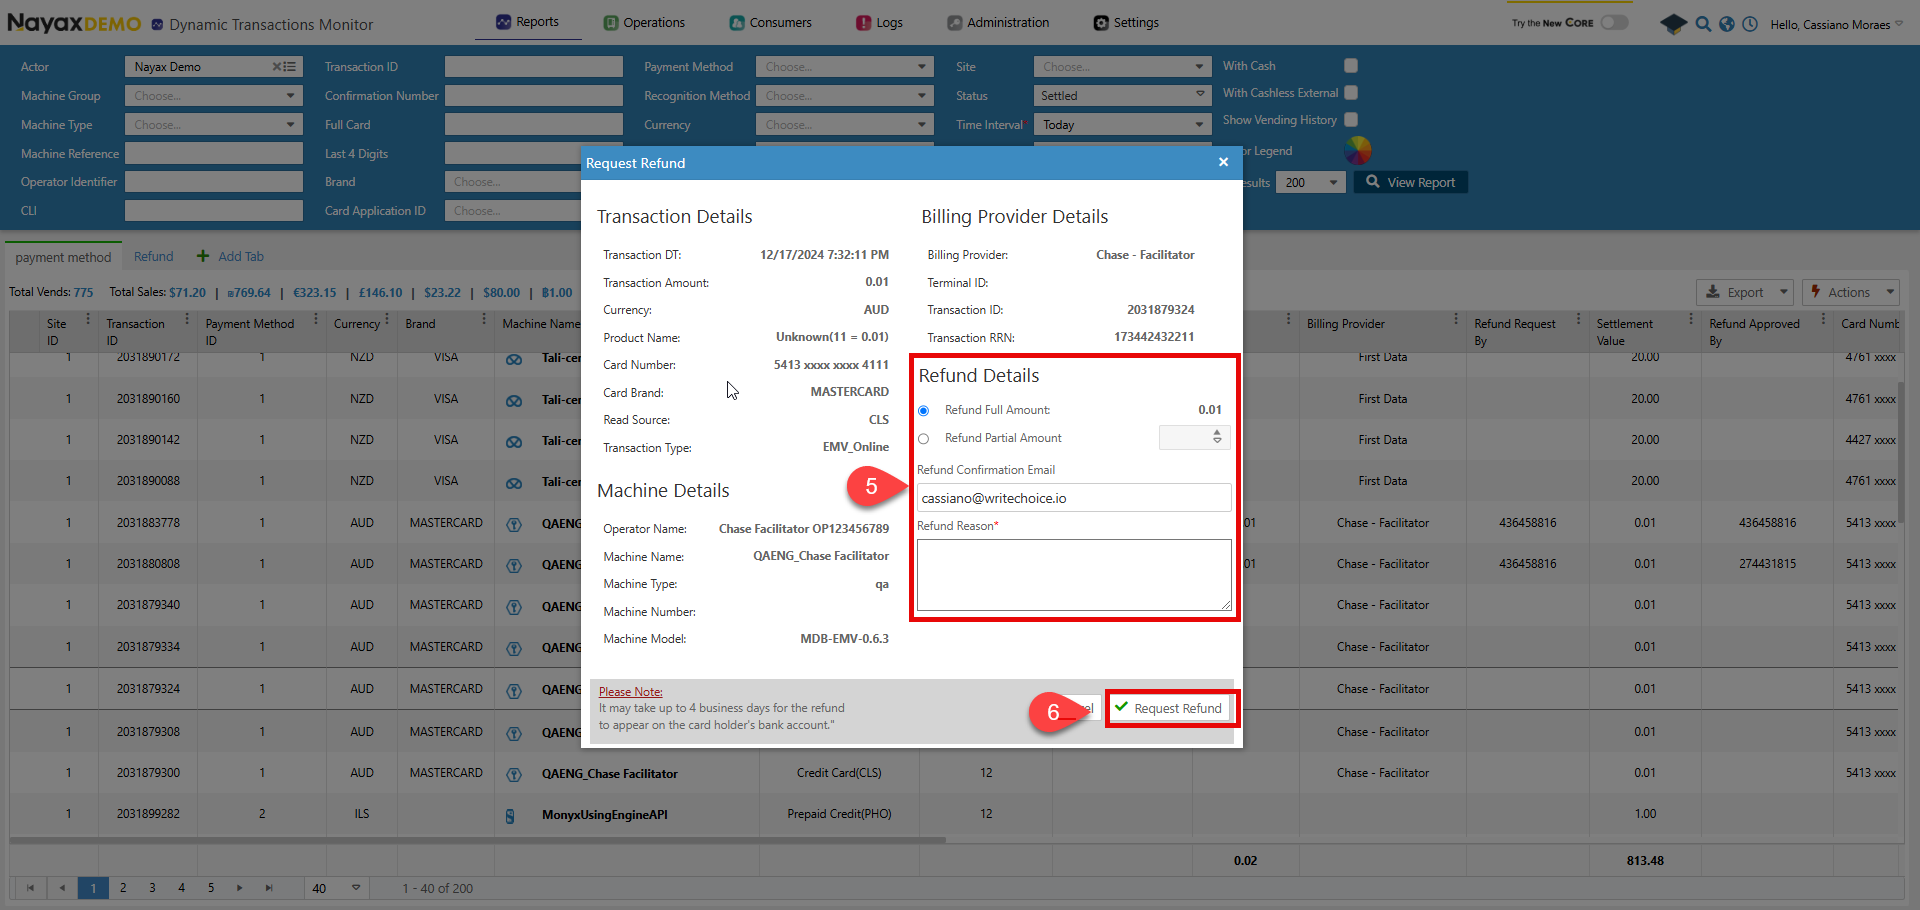
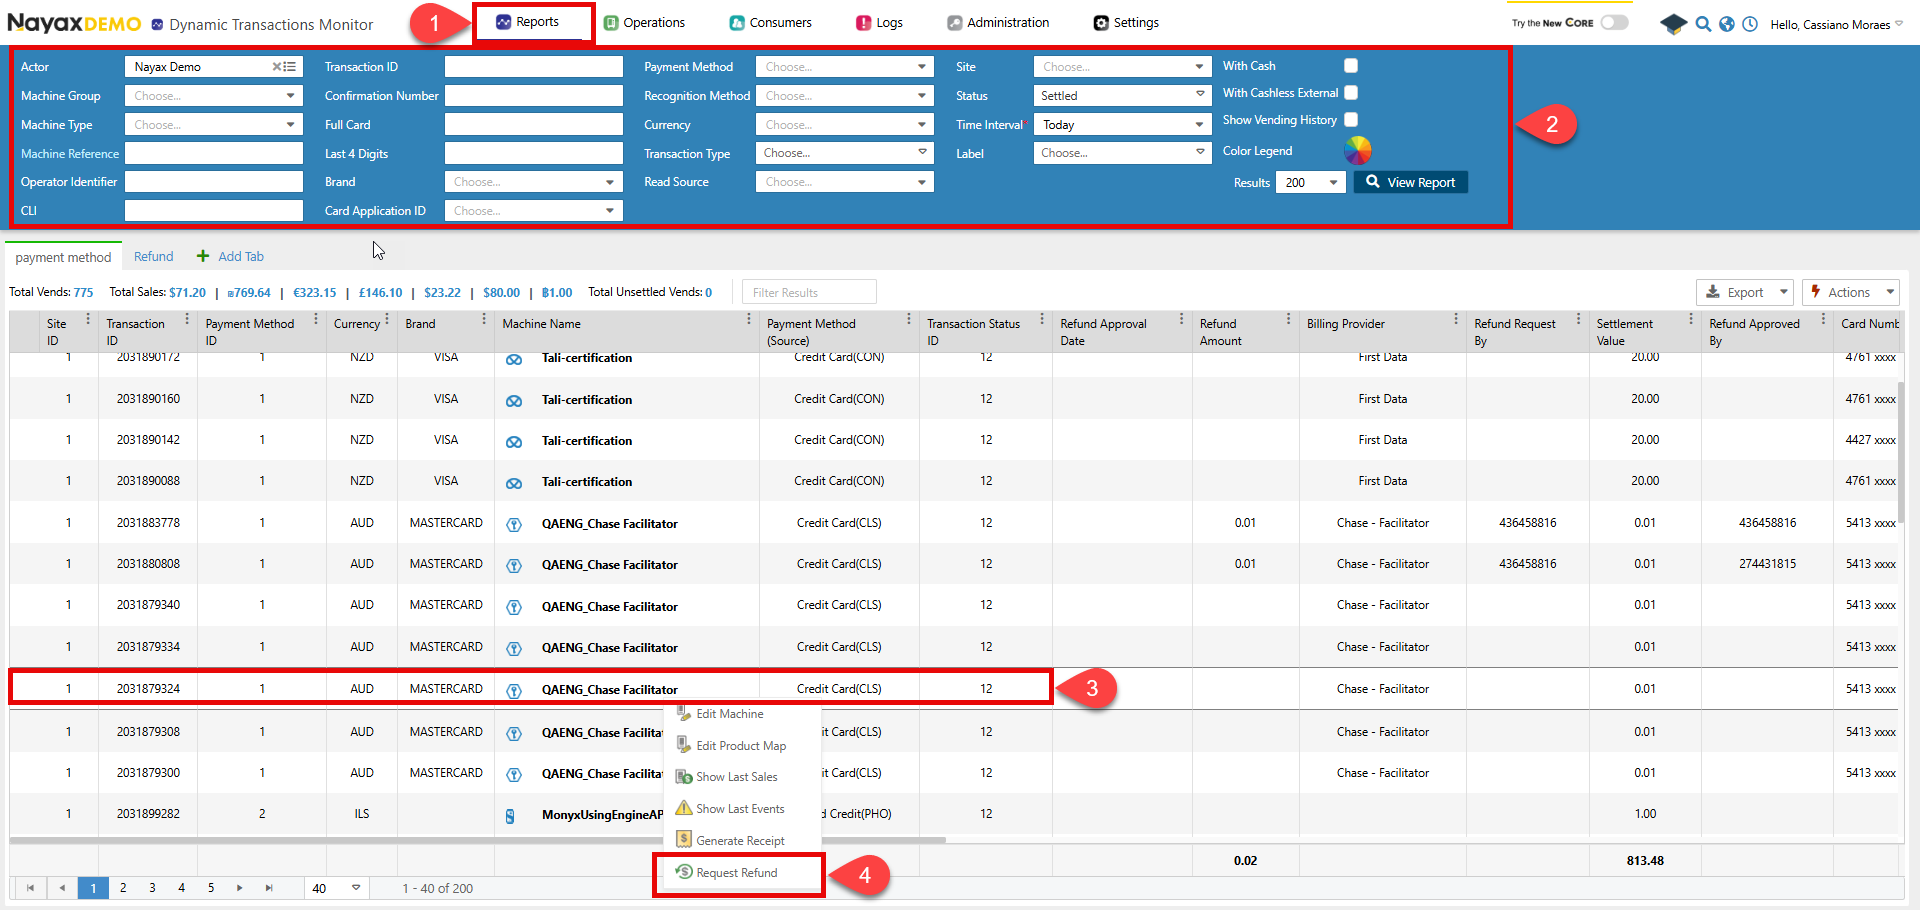 5. A pop-up window will appear. In it, choose if the refund is complete or partial and write the reason for the refund.
6. Click **Request Refund**.
5. A pop-up window will appear. In it, choose if the refund is complete or partial and write the reason for the refund.
6. Click **Request Refund**.
 ## Lynx API
This process can be performed programmatically through the Lynx API. The following endpoint is used to process the refund.
**Authentication**
Refer to the [Security & Token](/docs/manage-data-operations/lynx-api/security) page of this documentation to learn how to access your tokens and how to properly use them to authenticate your API requests.
### Initiating the request
To start the request, use the [Request a Payment Refund](/reference/lynx/payment/request-a-payment-refund) endpoint to request a refund. Providing the attributes regarding the rebate in the body parameters of the request, as exemplified below:
```sh Request theme={null}
curl --request POST \
--url https://qa-lynx.nayax.com/operational/v1/payment/refund-request \
--header 'accept: application/json' \
--header 'content-type: application/json' \
--data '
{
"RefundAmount": 0,
"RefundEmailList": "string",
"RefundReason": "string",
"TransactionId": 0,
"SiteId": 0,
"MachineAuTime": "2024-10-10T16:30:37.179Z"
}
'
```
Below, you can see a description of each of the parameters:
| **Name** | **Type** | **Description** |
| :------------------ | :-------------- | :-------------------------------------------------------------------------- |
| **RefundAmount** | `double / null` | The amount to be refunded to the customer. |
| **RefundEmailList** | `string / null` | A list of email addresses to notify about the refund, separated by commas. |
| **RefundReason** | `string / null` | The reason for requesting the refund. |
| **TransactionId** | `int64` | The unique identifier of the transaction for which the refund is requested. |
| **SiteId** | `int32` | The unique identifier of the site where the transaction occurred. |
| **MachineAuTime** | `date-time` | The machine's authorization time is associated with the transaction. |
### How to obtain TransactionID and SiteID
Retrieve `TransactionId` and `SiteId` from the Lynx API using the [Get Last Sales for Machine](/reference/lynx/machines/get-last-sales-for-machine-by-machineid) endpoint with the `MachineID`. The response object includes both values.
## Request Status
Once you send the request, a notification email will be sent to the email address entered in the request parameters.
The refund is now in the `pending` status and will need to be approved or declined. See [Approve or Decline a Refund](/docs/manage-data-operations/lynx-api/refunds/approve-or-decline-a-refund) for more details.
## Lynx API
This process can be performed programmatically through the Lynx API. The following endpoint is used to process the refund.
**Authentication**
Refer to the [Security & Token](/docs/manage-data-operations/lynx-api/security) page of this documentation to learn how to access your tokens and how to properly use them to authenticate your API requests.
### Initiating the request
To start the request, use the [Request a Payment Refund](/reference/lynx/payment/request-a-payment-refund) endpoint to request a refund. Providing the attributes regarding the rebate in the body parameters of the request, as exemplified below:
```sh Request theme={null}
curl --request POST \
--url https://qa-lynx.nayax.com/operational/v1/payment/refund-request \
--header 'accept: application/json' \
--header 'content-type: application/json' \
--data '
{
"RefundAmount": 0,
"RefundEmailList": "string",
"RefundReason": "string",
"TransactionId": 0,
"SiteId": 0,
"MachineAuTime": "2024-10-10T16:30:37.179Z"
}
'
```
Below, you can see a description of each of the parameters:
| **Name** | **Type** | **Description** |
| :------------------ | :-------------- | :-------------------------------------------------------------------------- |
| **RefundAmount** | `double / null` | The amount to be refunded to the customer. |
| **RefundEmailList** | `string / null` | A list of email addresses to notify about the refund, separated by commas. |
| **RefundReason** | `string / null` | The reason for requesting the refund. |
| **TransactionId** | `int64` | The unique identifier of the transaction for which the refund is requested. |
| **SiteId** | `int32` | The unique identifier of the site where the transaction occurred. |
| **MachineAuTime** | `date-time` | The machine's authorization time is associated with the transaction. |
### How to obtain TransactionID and SiteID
Retrieve `TransactionId` and `SiteId` from the Lynx API using the [Get Last Sales for Machine](/reference/lynx/machines/get-last-sales-for-machine-by-machineid) endpoint with the `MachineID`. The response object includes both values.
## Request Status
Once you send the request, a notification email will be sent to the email address entered in the request parameters.
The refund is now in the `pending` status and will need to be approved or declined. See [Approve or Decline a Refund](/docs/manage-data-operations/lynx-api/refunds/approve-or-decline-a-refund) for more details.