> ## Documentation Index
> Fetch the complete documentation index at: https://devzone.nayax.com/llms.txt
> Use this file to discover all available pages before exploring further.

# 向卡中添加信用额度

export const EndpointCard = ({method = "API", title, children, href, arrow = true}) => {
  const METHOD_STYLES = {
    GET: {
      bg: "mint-bg-green-400/20 dark:mint-bg-green-400/20",
      text: "mint-text-green-700 dark:mint-text-green-400",
      border: "mint-border-green-300 dark:mint-border-green-700"
    },
    POST: {
      bg: "mint-bg-blue-400/20 dark:mint-bg-blue-400/20",
      text: "mint-text-blue-700 dark:mint-text-blue-400"
    },
    PUT: {
      bg: "mint-bg-yellow-400/20 dark:mint-bg-yellow-400/20",
      text: "mint-text-yellow-700 dark:mint-text-yellow-400"
    },
    PATCH: {
      bg: "mint-bg-orange-400/20 dark:mint-bg-orange-400/20",
      text: "mint-text-orange-700 dark:mint-text-orange-400"
    },
    DELETE: {
      bg: "mint-bg-red-400/20 dark:mint-bg-red-400/20",
      text: "mint-text-red-700 dark:mint-text-red-400"
    },
    API: {
      bg: "mint-bg-black",
      text: "mint-text-white"
    }
  };
  const MethodBadge = ({method}) => {
    const style = METHOD_STYLES[method?.toUpperCase()] ?? METHOD_STYLES.GET;
    return <span className={`
          method-pill rounded-lg font-bold px-1.5 py-0.5 text-xs leading-5 ${style.bg} ${style.text}`}>
        {method?.toUpperCase()}
      </span>;
  };
  const content = <div className="group flex items-center gap-4 border border-gray-200 dark:border-gray-700 rounded-xl p-5 bg-white dark:bg-[#1e1e1e] hover:border-gray-400 dark:hover:border-gray-500 hover:shadow-md transition-all cursor-pointer">
      {}
      <div className="flex-1 min-w-0">
        <p className="font-semibold text-gray-900 dark:text-white text-sm leading-snug">{title}</p>
        {children && <p className="mt-1 text-sm text-gray-500 dark:text-gray-400 line-clamp-2">{children}</p>}
      </div>

      {}
      <div className="shrink-0">
        <MethodBadge method={method} />
      </div>
    </div>;
  if (!href) return content;
  return <a href={href} className="block no-underline border-b-0 mb-2">
      {content}
    </a>;
};

本指南将引导您使用 Lynx API 为卡片充值。最后，您将学习如何在 Nayax Core 中验证这些更改。

本指南中使用了以下端点：

<EndpointCard title="为卡添加信用额度" href="/reference/lynx/cards/add-credit-to-a-card" method="post" />

<Warning>
  验证

  请参阅本文档的[“安全和令牌”](/docs/manage-data-operations/lynx-api/security)页面，了解如何访问您的令牌，以及如何正确使用它来验证您的 API 请求。
</Warning>

## 为卡片充值的方法

为卡片充值会增加其可用余额，使持卡人能够进行交易。Lynx API 提供了几种实现方式：

* PUT Method：使用此选项，您可以使用与创建或检索卡片数据相同的端点，但改用带有新充值金额的 PUT 请求。例如，您可以使用 [Update Card by ID](/reference/lynx/cards/update-card-by-id) 端点，在 URL 中提供 `CardID`，并在正文参数中提供更新后的充值金额。
* POST 方法：Lynx API 还提供了一个专门的端点，用于执行 POST 请求以向卡片添加信用额度。这是一个更简单的选项，因为您无需处理 PUT 方法所涉及的更大的 body 对象。

在本指南中，我们将介绍使用 POST 方法为卡片添加信用额度的方法。但您也可以查看 Updating Card Details 页面，了解有关 PUT 请求的更多详细信息。

## 添加信用额度

要为卡片添加信用额度，您可以在 [Add Credit to a Card](/reference/lynx/cards/add-credit-to-a-card) 端点上使用 POST 方法，并在 URL 中发送卡片的唯一标识符（Unique Identifier）。请参见下方的示例查询：

<CodeGroup>
  ```sh Request theme={null}
  curl --request POST \
       --url 'https://qa-lynx.nayax.com/operational/v1/cards/{CardUniqueIdentifier}/credit/add?CardCredit=50&CreditChangeRemarks=Adding%20credit' \
       --header 'accept: application/json'
  ```

  ```json Response theme={null}
  {
    "value": 50
  }
  ```
</CodeGroup>

<Note>
  将 `{CardUniqueIdentifier}` 替换为该卡的实际标识符。
</Note>

要添加的金额通过查询参数发送，请参见下方列表中的可用参数：

* `CardCredit`：要添加的信用额度金额。
* `CreditChangeRemarks`：用于追踪目的的交易备注。

## 在 Nayax Core 中验证信用额度

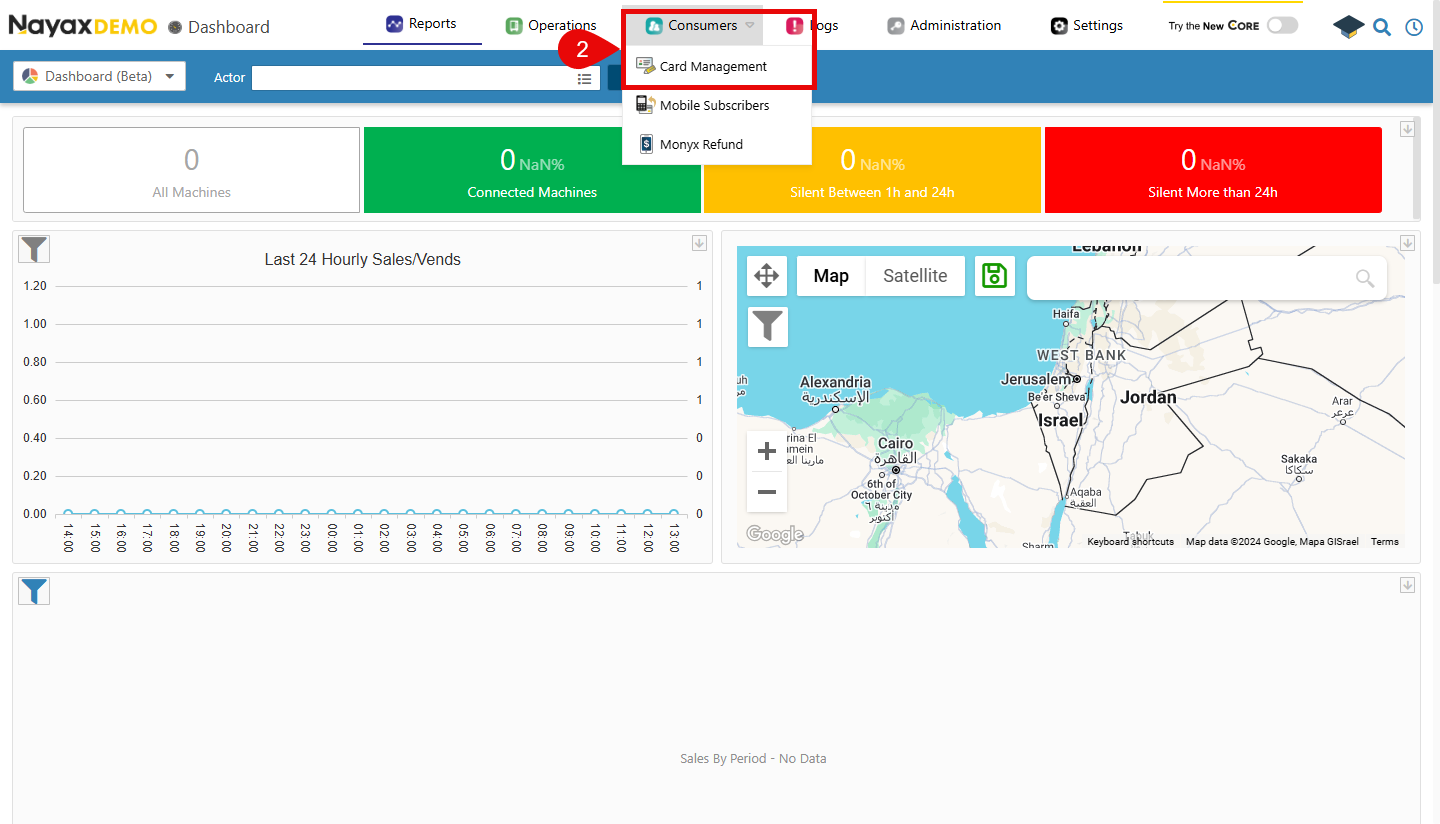
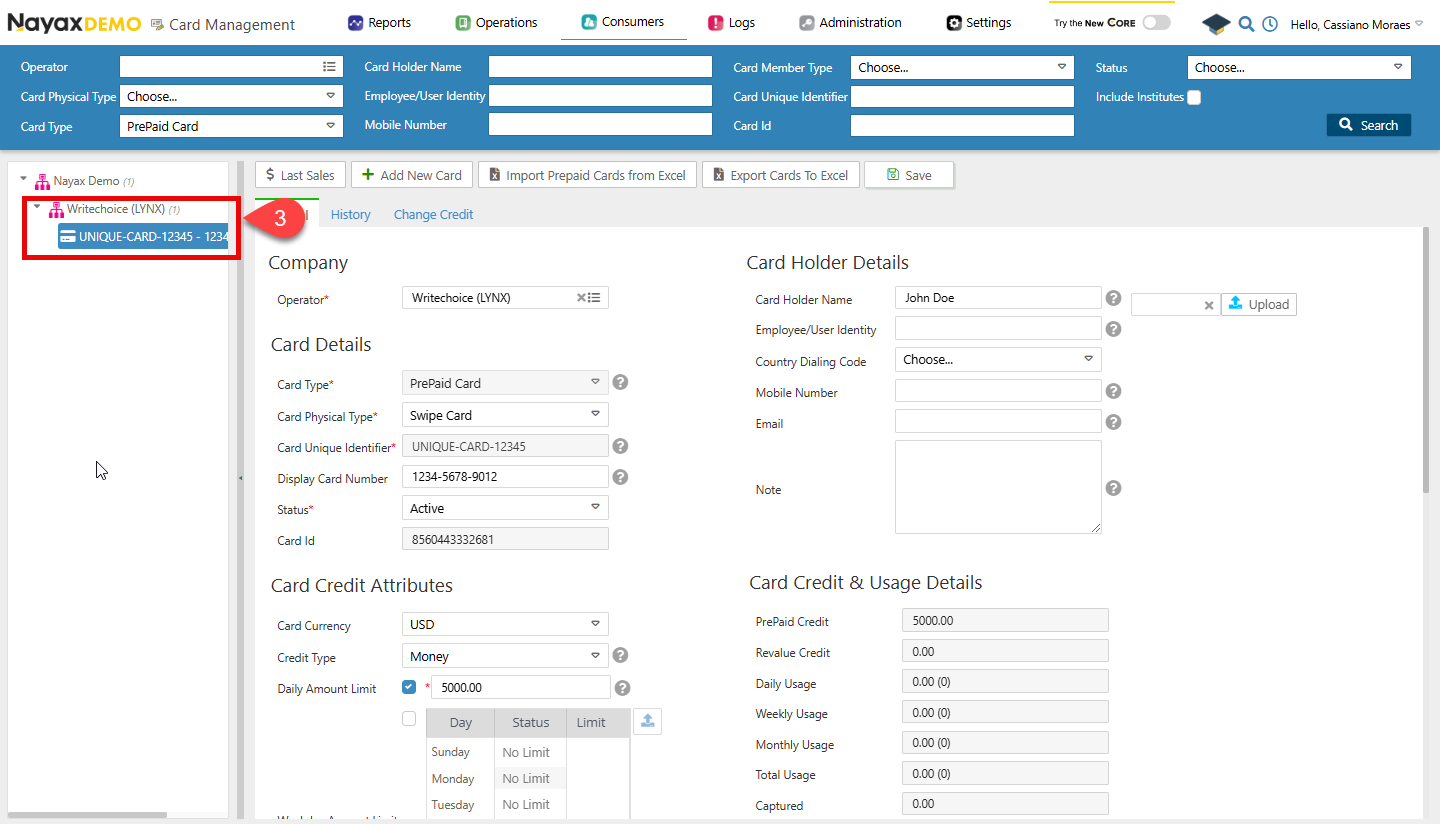
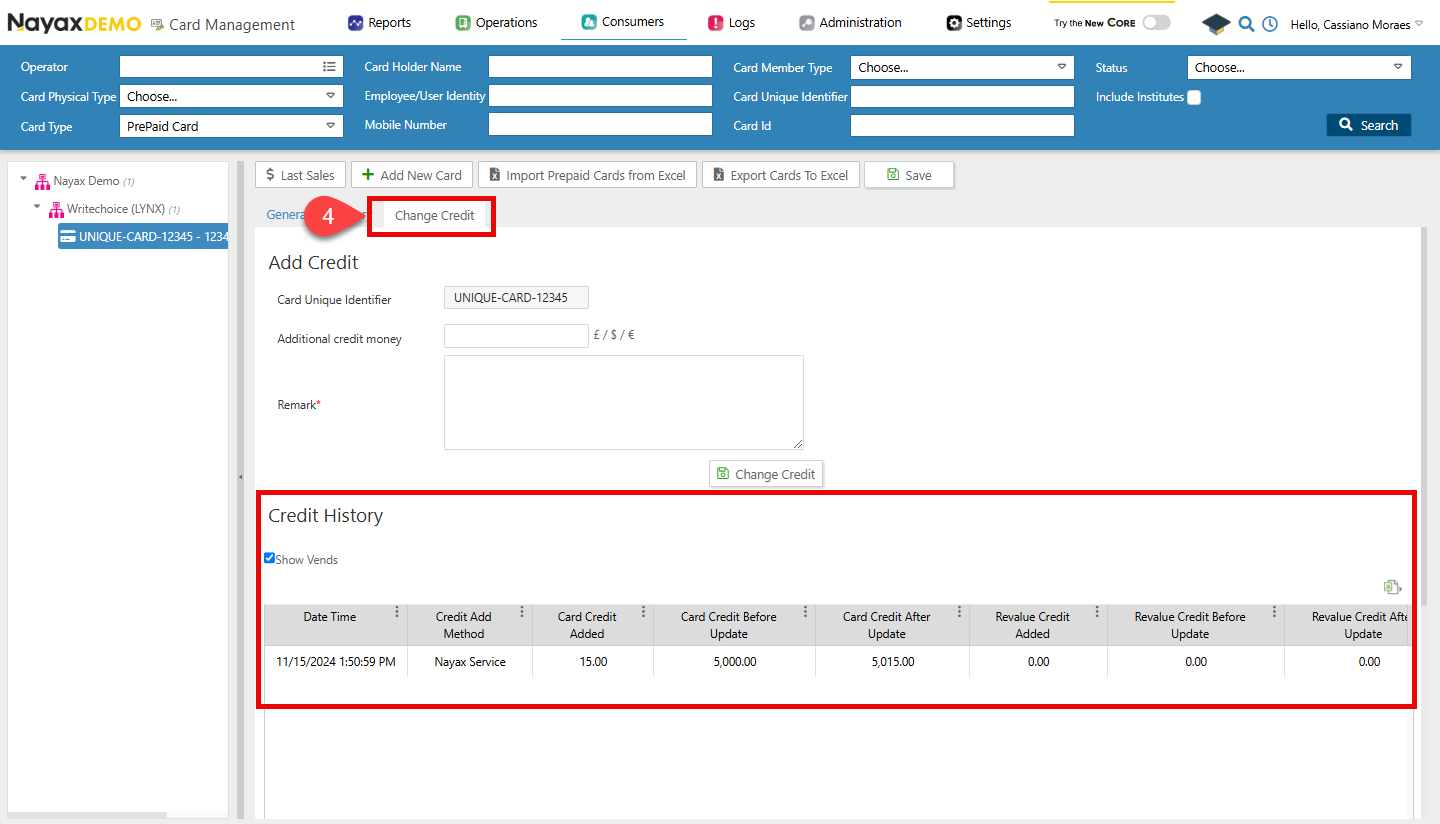
添加卡片信用额度的请求成功后，您可以前往 Nayax Core，在 Card Management 选项卡中查看该卡片的信用额度和历史记录。请按照以下步骤操作。

1. 访问您的 Nayax Core 仪表板

2. 在顶部菜单上，导航至**消费者 > 卡片管理**

   <Frame>
     <img src="https://mintcdn.com/nayax-44d6e37b/1pW0jXOF4OhjjY4f/images/docs/add-credit-to-card/image1.png?fit=max&auto=format&n=1pW0jXOF4OhjjY4f&q=85&s=dc7fdec917b615b3196bbf0097a16076" width="1440" height="824" data-path="images/docs/add-credit-to-card/image1.png" />
   </Frame>

3. 搜索添加了信用额度的卡片并选择它。

   <Frame>
     <img src="https://mintcdn.com/nayax-44d6e37b/1pW0jXOF4OhjjY4f/images/docs/add-credit-to-card/image2.png?fit=max&auto=format&n=1pW0jXOF4OhjjY4f&q=85&s=8a418edb9c3c431df24ab71a0a271d16" width="1440" height="824" data-path="images/docs/add-credit-to-card/image2.png" />
   </Frame>

4. 打开 Change Credit 选项卡，并查看 Credit History 部分。

   <Frame>
     <img src="https://mintcdn.com/nayax-44d6e37b/1pW0jXOF4OhjjY4f/images/docs/add-credit-to-card/image3.png?fit=max&auto=format&n=1pW0jXOF4OhjjY4f&q=85&s=327b8ef5db910218e914945ad64a0f31" width="1440" height="824" data-path="images/docs/add-credit-to-card/image3.png" />
   </Frame>

在那里，您将能够看到该卡片的 Credit History（信用额度历史记录），找到通过 Lynx API 添加的信用额度，并将金额或备注与请求中发送的内容进行匹配。

<br />


This documentation is built and hosted on [Mintlify](https://mintlify.com), a developer documentation platform.