> ## Documentation Index
> Fetch the complete documentation index at: https://devzone.nayax.com/llms.txt
> Use this file to discover all available pages before exploring further.

# 创建卡片

export const EndpointCard = ({method = "API", title, children, href, arrow = true}) => {
  const METHOD_STYLES = {
    GET: {
      bg: "mint-bg-green-400/20 dark:mint-bg-green-400/20",
      text: "mint-text-green-700 dark:mint-text-green-400",
      border: "mint-border-green-300 dark:mint-border-green-700"
    },
    POST: {
      bg: "mint-bg-blue-400/20 dark:mint-bg-blue-400/20",
      text: "mint-text-blue-700 dark:mint-text-blue-400"
    },
    PUT: {
      bg: "mint-bg-yellow-400/20 dark:mint-bg-yellow-400/20",
      text: "mint-text-yellow-700 dark:mint-text-yellow-400"
    },
    PATCH: {
      bg: "mint-bg-orange-400/20 dark:mint-bg-orange-400/20",
      text: "mint-text-orange-700 dark:mint-text-orange-400"
    },
    DELETE: {
      bg: "mint-bg-red-400/20 dark:mint-bg-red-400/20",
      text: "mint-text-red-700 dark:mint-text-red-400"
    },
    API: {
      bg: "mint-bg-black",
      text: "mint-text-white"
    }
  };
  const MethodBadge = ({method}) => {
    const style = METHOD_STYLES[method?.toUpperCase()] ?? METHOD_STYLES.GET;
    return <span className={`
          method-pill rounded-lg font-bold px-1.5 py-0.5 text-xs leading-5 ${style.bg} ${style.text}`}>
        {method?.toUpperCase()}
      </span>;
  };
  const content = <div className="group flex items-center gap-4 border border-gray-200 dark:border-gray-700 rounded-xl p-5 bg-white dark:bg-[#1e1e1e] hover:border-gray-400 dark:hover:border-gray-500 hover:shadow-md transition-all cursor-pointer">
      {}
      <div className="flex-1 min-w-0">
        <p className="font-semibold text-gray-900 dark:text-white text-sm leading-snug">{title}</p>
        {children && <p className="mt-1 text-sm text-gray-500 dark:text-gray-400 line-clamp-2">{children}</p>}
      </div>

      {}
      <div className="shrink-0">
        <MethodBadge method={method} />
      </div>
    </div>;
  if (!href) return content;
  return <a href={href} className="block no-underline border-b-0 mb-2">
      {content}
    </a>;
};

卡片是满足各种业务需求的多功能解决方案，例如方便付款、发放退款、提供折扣或授予服务访问权限。本页面将指导您使用 Lynx API 创建卡片以及如何在 Nayax Core 中验证卡片。

## 卡类型

Nayax 提供多种类型的卡，每种卡都有不同的用途：

* **预付卡**：预付卡预先充值，是控制支出的理想选择。它们通常用于礼品卡、员工津贴或消费交易，兼具便捷性和安全性。
* **技术员卡**：这些卡发给服务技术人员或员工，方便访问特定系统或授权与工作相关的交易，确保现场安全操作。
* **退款卡**：这些卡专为处理退款而设计，可以有效地将资金退还给客户，简化财务工作流程并提高客户满意度。
* **折扣卡**：折扣卡用于忠诚度计划或促销活动，提供折扣价或特别优惠等独家优惠，鼓励客户保留和参与。

在本指南中，我们将展示一个创建预付卡的 API 请求，但所有预付卡都可以用相同的方式创建。

## 卡片创建

要使用 Lynx API 创建新的虚拟信用卡，您可以在两个不同的端点上使用**POST**方法：

<Warning>
  验证

  请参阅本文档的[“安全和令牌”](/docs/manage-data-operations/lynx-api/security)页面，了解如何访问您的令牌，以及如何正确使用它来验证您的 API 请求。
</Warning>

以下部分将指导您通过 Lynx API 使用这些选项中的任何一个来创建卡片。

### V1 端点

V1 版本仅需创建基本卡片所需的必要字段，可选字段极少。要创建卡片，请向 [“创建虚拟卡”](/reference/lynx/cards/create-virtual-card) 端点发送 **POST** 请求，并在请求体参数中填写卡片详细信息。请参见以下代码块中的示例：

```sh theme={null}
curl --request POST \
     --url https://qa-lynx.nayax.com/operational/v1/cards \
     --header 'accept: application/json' \
     --header 'content-type: application/json' \
     --data '
{
  "ActorID": 2001492652,
  "CardDisplayNumber": "1234-5678-9012",
  "CardUniqueIdentifier": "UNIQUE-CARD-12345",
  "CardHolderName": "John Doe",
  "CardStatus": 1,
  "CardType": 33,
  "CardUserIdentity": "USER12345",
  "CountryID": 840,
  "Currency": 1,
  "MobileNumber": "0505555555",
  "MemberType": 801,
  "CardActivationDate": "2024-11-14T09:00:00Z",
  "CardPhysicalType": 30000529,
  "CardImageUrl": "https://example.com/image.png",
  "CardExpirationDate": "2025-11-14T09:00:00Z",
  "CardNote": "Prepaid card for internal use",
  "wd_limits_money": 5000.00,
  "use_wd_limit": true,
  "wd_limits_trans": 100
}'

```

使用 V1 选项时，这些是必填字段：

* `ActorID`：运营商 ID，用于追踪卡片发行方。
* `CardUniqueIdentifier`：卡片的唯一标识符。
* `CardStatus`：卡片状态（1 = 激活，2 = 未激活）。
* `CardType`：卡片类型。
  * Prepaid Card（预付卡）：`33`
  * Technician Card（技术员卡）：`31`
  * Refund Card（退款卡）：`34`
  * Discount Card（折扣卡）：`30000616`
* `CountryID`：基于 ISO 标准的国家/地区代码（可在 “Lookups” 部分查看）。
* `Currency`：货币代码。
* `CardPhysicalType`：卡片的物理类型，可选项如下：
  * `0000528`：刷卡式卡片（Swipe Card）
  * `30000529`：接触式卡片（Contact Card）
  * `30000530`：非接触式卡片（Contactless Card）
  * `30000531`：非接触式贴纸（Contactless Sticker）
  * `30000532`：Monyx App 虚拟 ID
  * `30000533`：自定义第三方 ID
  * `30000534`：接触式 + 非接触式双卡
  * `30000535`：刷卡式 + 非接触式双卡
  * `30000601`：Monyx 虚拟卡
  * `943237560`：二维码（QR Code）

成功的请求将返回一个包含新创建的卡的详细信息的 JSON 对象。

### V2 端点

V2 选项提供了扩展功能，包括用于详细自定义的其他字段。此版本允许您指定卡片类型、物理类型、会员等级、激活和到期日期以及群组限制。
要创建卡片，请向[ Create New Card](/reference/lynx/cards/create-new-card) 端点发送 POST 请求，并在 body 参数中填写卡片详细信息。请参见下方代码块中的示例：

```sh theme={null}
curl --request POST \
     --url https://qa-lynx.nayax.com/operational/v2/cards \
     --header 'Authorization: Bearer <YOUR_ACCESS_TOKEN>' \
     --header 'accept: application/json' \
     --header 'content-type: application/json' \
     --data '
{
  "CardDetails": {
    "ActorID": 2001492652,
    "CardUniqueIdentifier": "UNIQUE-CARD-67890",
    "CardDisplayNumber": "9876-5432-1234",
    "CardTypeID": 31,
    "PhysicalTypeID": 30000528,
    "Notes": "Technician card with custom limits",
    "Status": 1,
    "ExternalApplicationUserID": "EXT-USER-56789"
  },
  "CardHolderDetails": {
    "CardHolderName": "Alice Doe",
    "UserIdentity": "USER-56789",
    "CountryID": 840,
    "MobileNumber": "1234567890",
    "Email": "alice.doe@example.com",
    "MemberTypeID": 801
  },
  "CardCreditAttributes": {
    "CurrencyID": 1,
    "Credit": 100,
    "RevalueCredit": 50,
    "CreditTypeMoneyBit": true,
    "CreditAccumulateBit": true,
    "CreditSingleUseBit": false,
    "RevalueCashBit": true,
    "RevalueCreditCardBit": true,
    "AmountMonthlyReload": 200,
    "TransactionsMonthlyReload": 20,
    "DiscountTypeBit": 1,
    "DiscountValue": 10
  },
  "CardCreditLimits": {
    "AmountDailyLimit": 500,
    "AmountWeeklyLimit": 2000,
    "TransactionsDailyLimit": 10,
    "TransactionsWeeklyLimit": 50,
    "AmountMonthlyLimit": 10000,
    "TransactionsMonthlyLimit": 200,
    "DiscountTransactionsTotalLimit": 100,
    "MaxRevalueAmountLimit": 1000,
    "WeekDayLimitEnabledBit": true,
    "WeekDayAmountLimit": "100,200,300,400,500,600,700",
    "WeekDayTransactionLimit": "10,20,30,40,50,60,70"
  },
  "CardDateRules": {
    "ActivationDate": "2024-11-14T09:00:00Z",
    "ExpirationDate": "2025-11-14T09:00:00Z",
    "RevalueExpirationDate": "2025-10-10T09:00:00Z",
    "SetSingleUseDate": "2024-12-01T09:00:00Z",
    "RemoveSingleUseDate": "2024-12-15T09:00:00Z"
  },
  "CardRevalueRewardRules": [
    {
      "RuleID": 1,
      "RewardActorID": 123456,
      "Status": true,
      "RevalueAmount": 100,
      "RewardValueTypeBit": true,
      "RewardValue": 5
    }
  ],
  "GroupLocationLimits": [
    {
      "CardGroupEnabledBit": true,
      "GroupName": "Group A",
      "CardGroupId": 123,
      "GroupDailyLimit": 1000
    }
  ]
}'

```

使用 V2 选项时，这些是必填字段：

* `CardDetails`
  * `ActorID`：运营商 ID。
  * `CardUniqueIdentifier`：卡片唯一标识符。
  * `CardTypeID`：卡片类型。
  * `PhysicalTypeID`：卡片物理类型。
  * `Status`：1 表示激活。
* `CardHolderDetails`
  * `CardHolderName`：持卡人姓名。
  * `CountryID`：ISO 国家/地区代码。
  * `MemberTypeID`：会员类型。
* `CardCreditAttributes`
  * `CurrencyID`：货币代码。

成功的请求将返回一个包含所创建卡片详细信息的 JSON 对象，从而提供灵活性和对卡片功能的控制。

## 在 Nayax Core 中验证卡

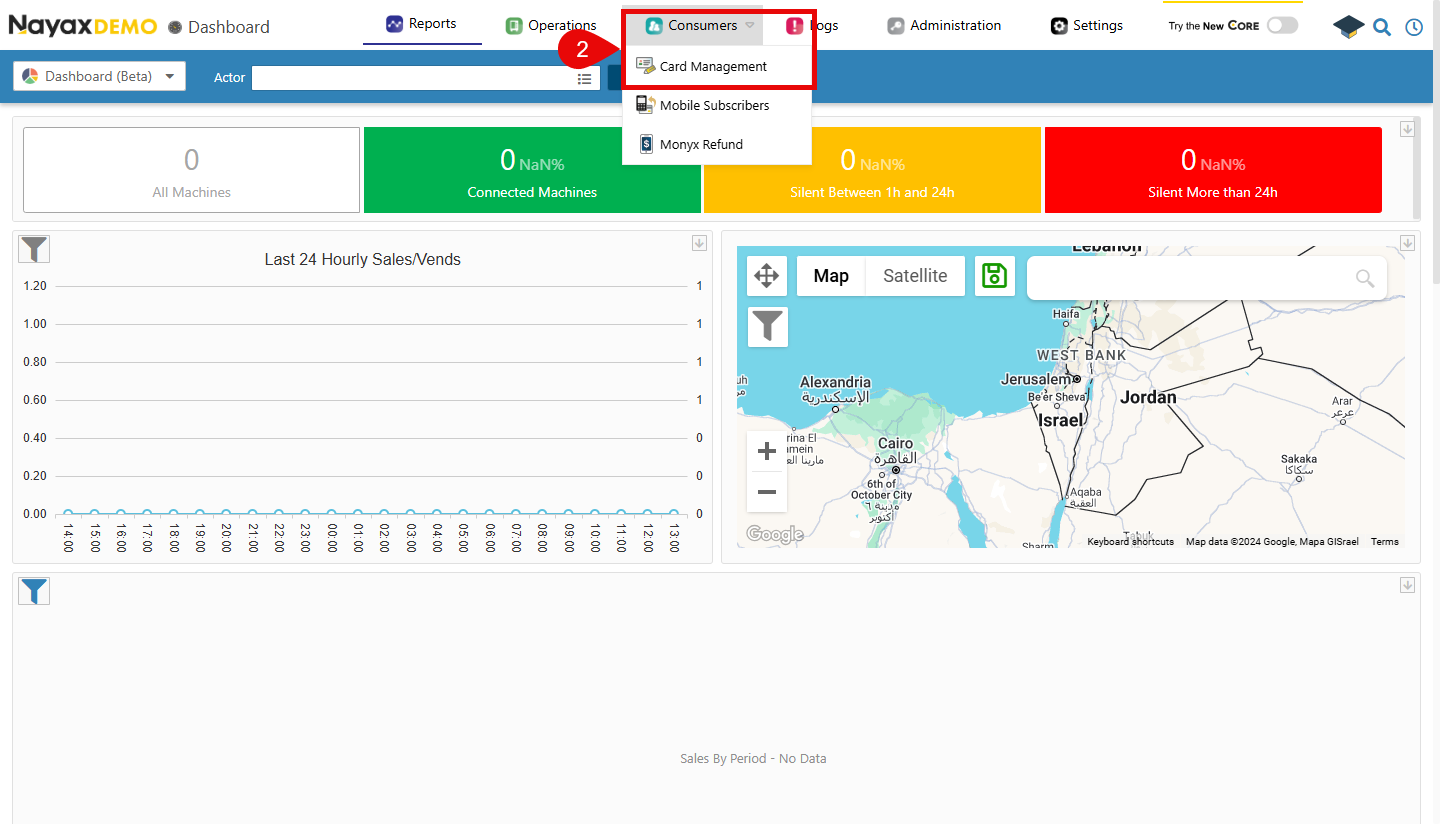
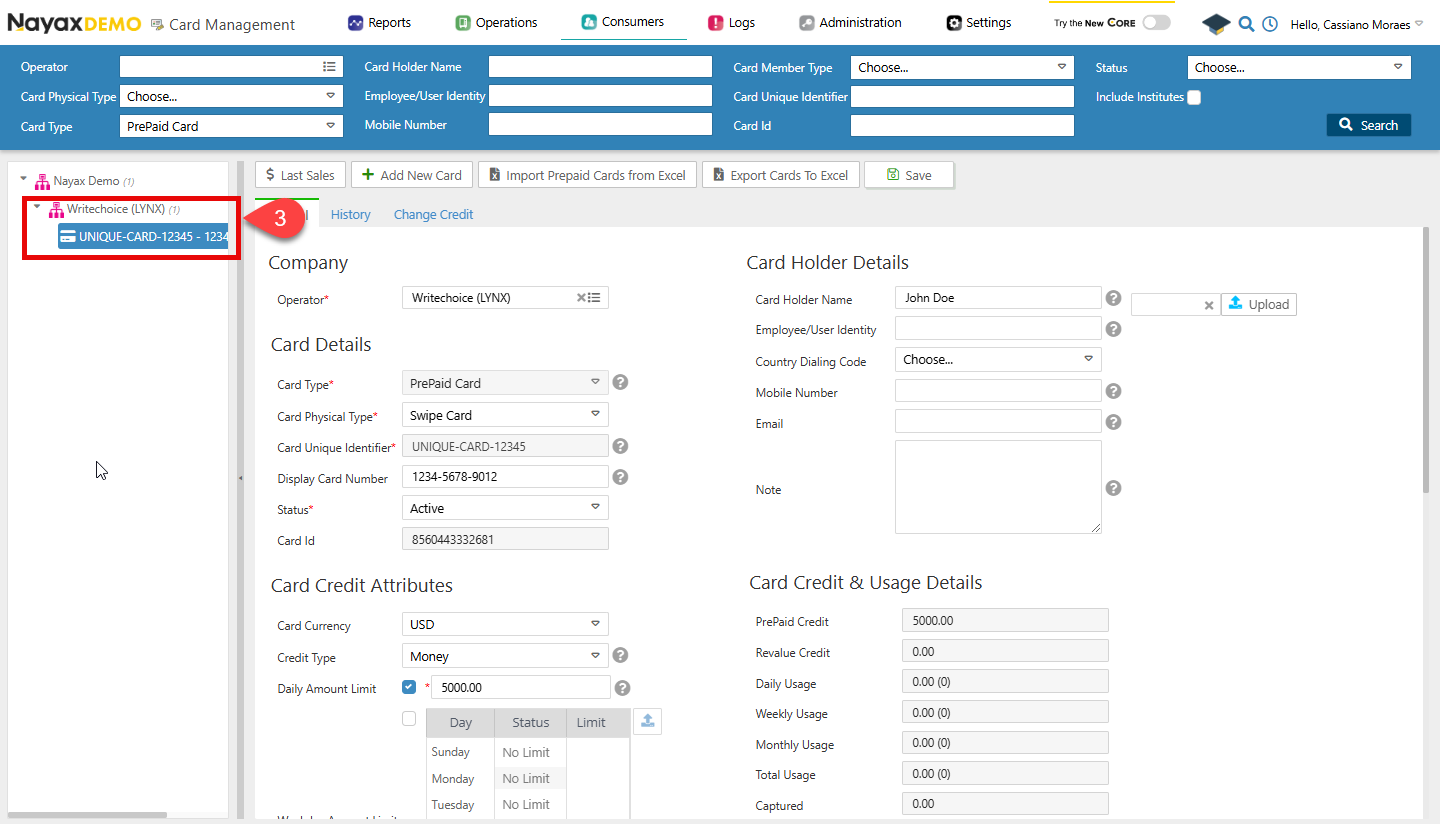
使用上述任何端点发送创建卡片的请求后，您可以前往 Nayax Core 并检查该卡片是否存在于**卡片管理**屏幕中。请按照以下步骤操作。

1. 访问您的 Nayax Core 仪表板
2. 在顶部菜单上，导航至**消费者 > 卡片管理**

   <Frame>
     <img src="https://mintcdn.com/nayax-44d6e37b/1pW0jXOF4OhjjY4f/images/docs/create-cards/image1.png?fit=max&auto=format&n=1pW0jXOF4OhjjY4f&q=85&s=06ef210ef0c70d82ce4da148535d7642" width="1440" height="824" data-path="images/docs/create-cards/image1.png" />
   </Frame>
3. 现在，您可以搜索创建的卡片并从列表中选择它。

   <Frame>
     <img src="https://mintcdn.com/nayax-44d6e37b/1pW0jXOF4OhjjY4f/images/docs/create-cards/image2.png?fit=max&auto=format&n=1pW0jXOF4OhjjY4f&q=85&s=5ff7bca027c53e591442fccee639a010" width="1440" height="824" data-path="images/docs/create-cards/image2.png" />
   </Frame>

通过 Lynx API 创建的卡片在 Nayax Core 中可用，确认已成功创建。

<Note>
  The `ExternalApplicationUserID` field won't appear in Nayax Core, but it would appear when using the **GET** method of the [cards](/reference/lynx/cards/get-cards) endpoint.
</Note>


This documentation is built and hosted on [Mintlify](https://mintlify.com), a developer documentation platform.